My customer reported an issue with DNS zones in VMC, so I needed it up in the lab to check the behavior. The DNS service in VMC allows you to specify DNS resolvers to forward requests. By default DNS is directed to 8.8.8.8 and 8.8.4.4. If you’re using Active Directory, you generally will set the forwarders to your domain controllers. But some customers need more granular control over DNS forwarding. For example – you could set the default forwarders to domain controllers for vmware.com, but maybe you just acquired Pivotal, and their domain controllers are at pivotal.com. DNS zones allow you direct any request for *.pivotal.com to a different set of DNS servers.
Step 1
First, I needed an IPSEC VPN from my homelab into VMC. I run Ubiquiti gear at home. I decided to go with a policy-based VPN because my team’s VMC lab has many different subnets with lots of overlap on my home network. I went to the Networking & Security tab, Overview screen which gave me the VPN public IP, as well as my appliance subnet. All of the management components, including the DNS resolvers, sit in the appliance subnet. So I will need those available across the VPN. Not shown here is another subnet 10.47.159.0/24, which contains jump hosts for our VMC lab.

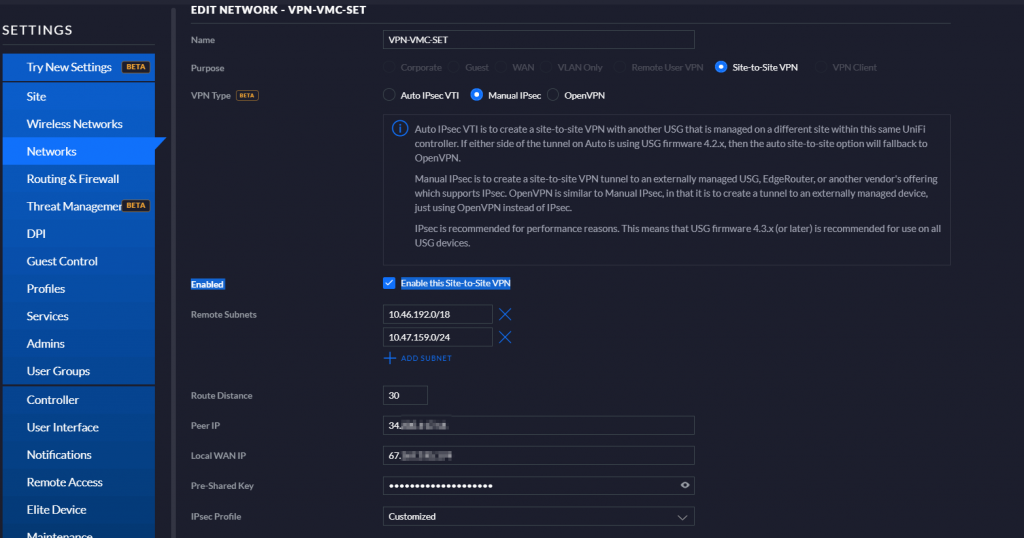
I set up the VPN in the Networks section of the UniFi controller – you add a VPN network just like you add any other wired or wireless network. I add the appliance subnet 10.46.192.0/18 and my jump host subnet 10.47.159.0/24. Peer IP is the VPN public IP, and local WAN IP is the public IP at home.
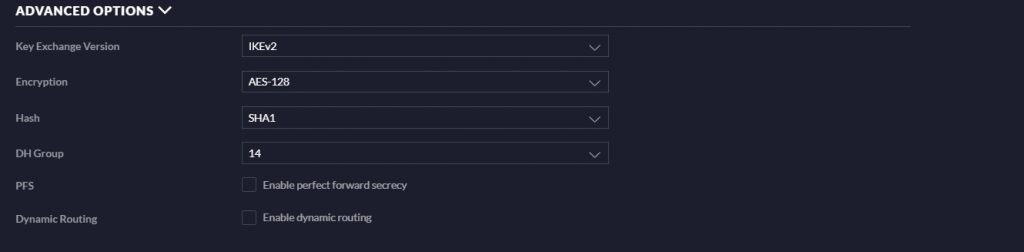
I could not get SHA2 working and never figured out why. Since this was just a temporary lab scenario, I went with SHA1
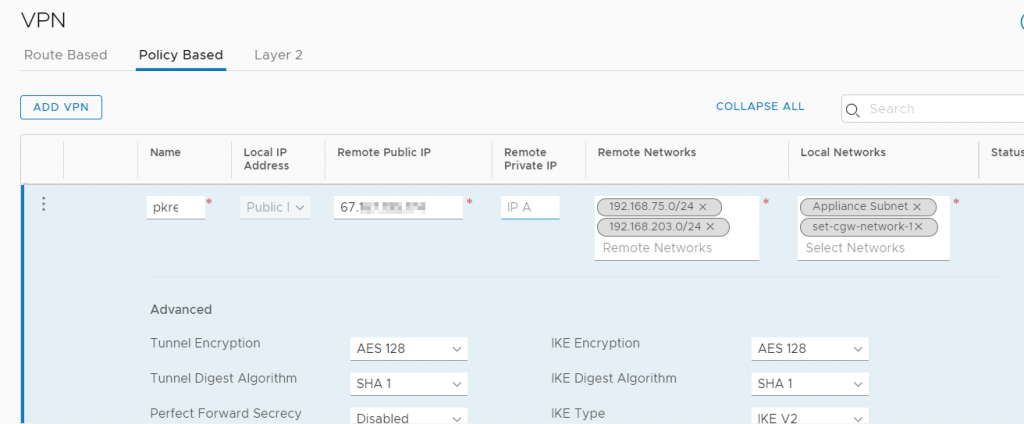
On the VMC side I created a policy based VPN. I selected the Public Local IP address, which matches the 34.x.x.x VMC VPN IP shown above. The remote Public IP is my public IP at home. Remote networks – 192.168.75.0/24 which contains my laptop, and 192.168.203.0/24 which contains my domain controllers. Then for local networks I added the Appliance subnet 10.46.192.0/18 and 10.47.159.0/24. The show up as their friendly name in the UI.
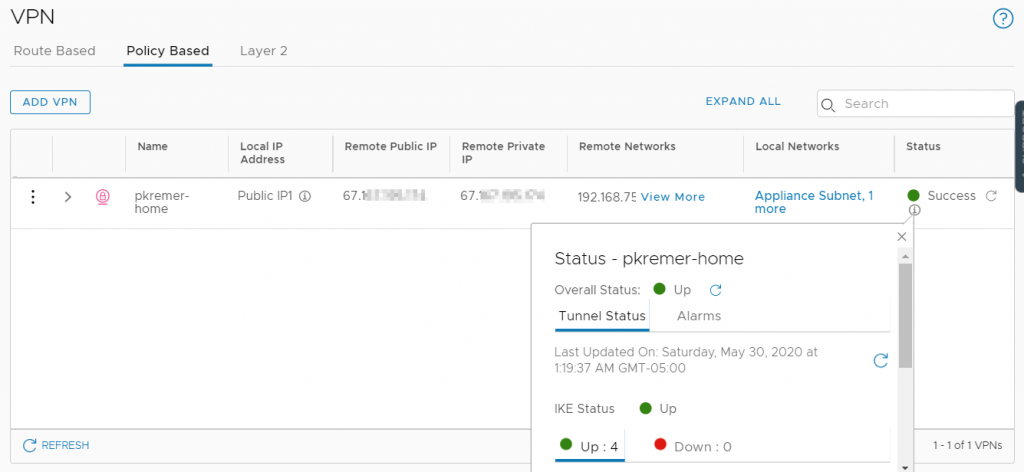
The VPN comes up.
Now I need to open an inbound firewall rule on the management gateway to allow my on-prem subnets to communicate with vCenter. I populate the Sources object with subnet 192.168.75.0/24 so my laptop can hit vCenter. I also set up a reverse rule (not shown) outbound from vCenter to that same group. This isn’t specifically necessary to get DNS zones to work since we can only do that for the compute gateway – it’s the compute VMs that need the DNS zone. But I wanted to reach vCenter over the VPN.

I create similar rules on the compute gateway to allow communication between my on-prem subnets and anything behind the compute gateway – best practice would be to lock down specific subnets and ports.
I try to ping vCenter 10.46.224.4 from my laptop on 192.168.75.0/24 and it fails. I run a traceroute and I see my first hop is my VPN connection into VMware corporate. I run ‘route print’ on my laptop and see the entire 10.0.0.0/8 is routed to the VPN connection.
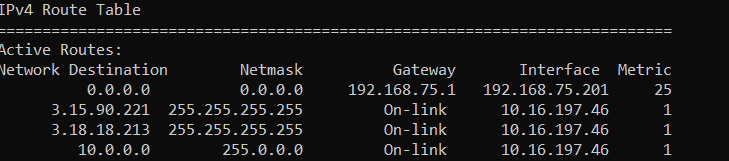
This means I will either have to disconnect from the corporate VPN to hit 10.x IP addresses in VMC, or I have to route around the VPN with a static route
At an elevated command prompt, I run these commands
route add 10.46.192.0 mask 255.255.192.0 192.168.75.1 metric 1 -p
route add 10.47.159.0 mask 255.255.255.0 192.168.75.1 metric 1 -p
This inserts two routes into my laptop’s route table. The -p means persistent, so the route will persist across reboots.
Now when I run a route print I can see that for my VMC appliance subnet and jump host subnet.

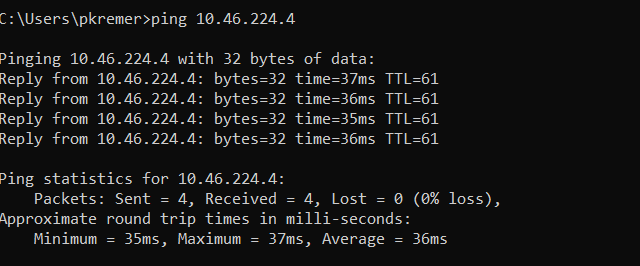
I can now ping vCenter by private IP from my laptop. I can also ping servers in the jump host subnet.
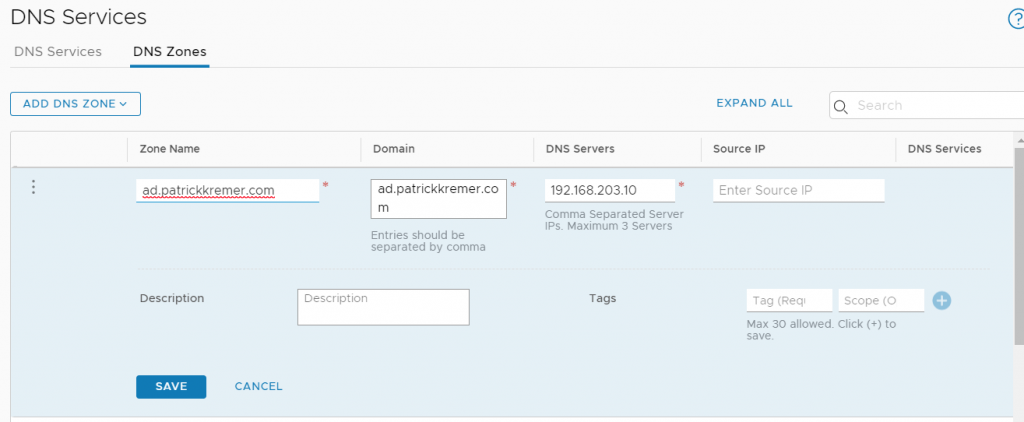
Now to create a DNS zone – I point to one of my domain controllers on-prem – in production you would of course point to multiple domain controllers.
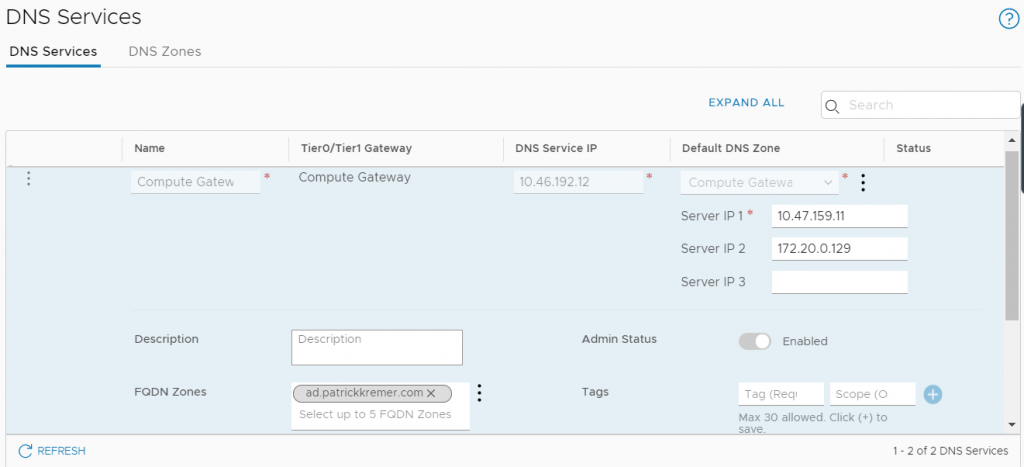
I flip back to DNS services and edit the Compute Gateway forwarder. The existing DNS forwarders point to our own internal lab domain, and we don’t want to break that communication. What we do want is to have queries destined for my homelab AD redirected to my homelab DNS servers. We add the zone to the FQDN Zones box and click save.
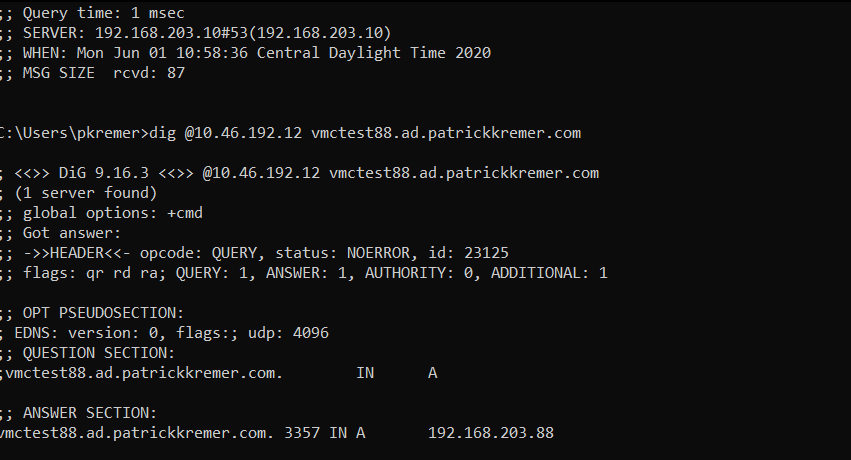
Now we run a test – you can use nslookup, but I downloaded the BIND tools so I can use dig on Windows.
First dig against my homelab domain controller
dig @192.168.203.10 vmctest88.ad.patrickkremer.com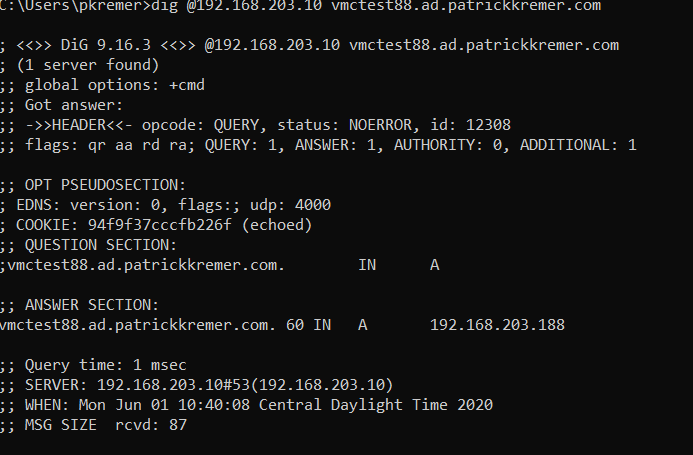
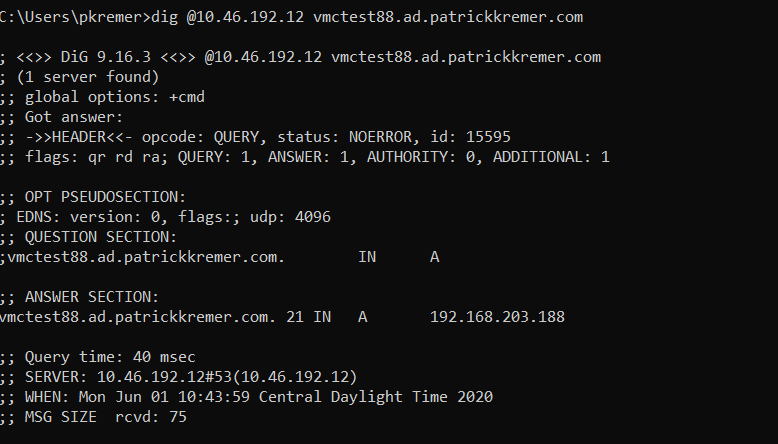
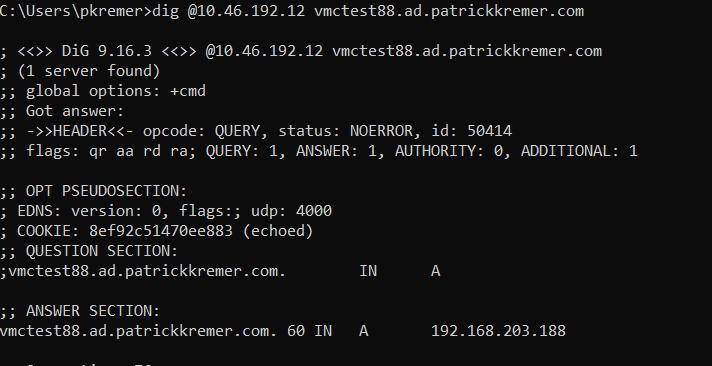
Then against the VMC DNS server 10.46.192.12
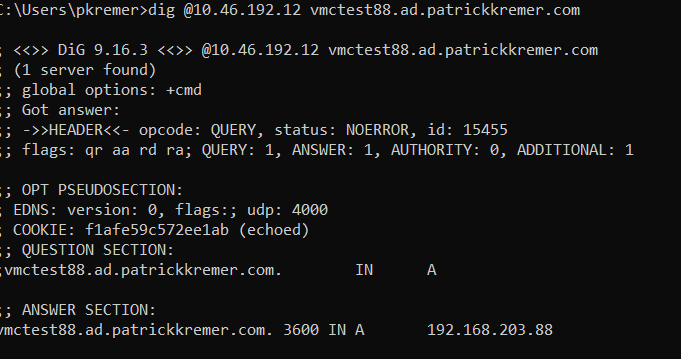
dig @10.46.192.12 vmctest88.ad.patrickkremer.com
The correct record appears. You can see the TTL next to the DNS entry at 60 seconds – the VMC DNS server will cache the entry for the TTL that I have configured on-prem. If I dig again, you can see the TTL counting down toward 0.
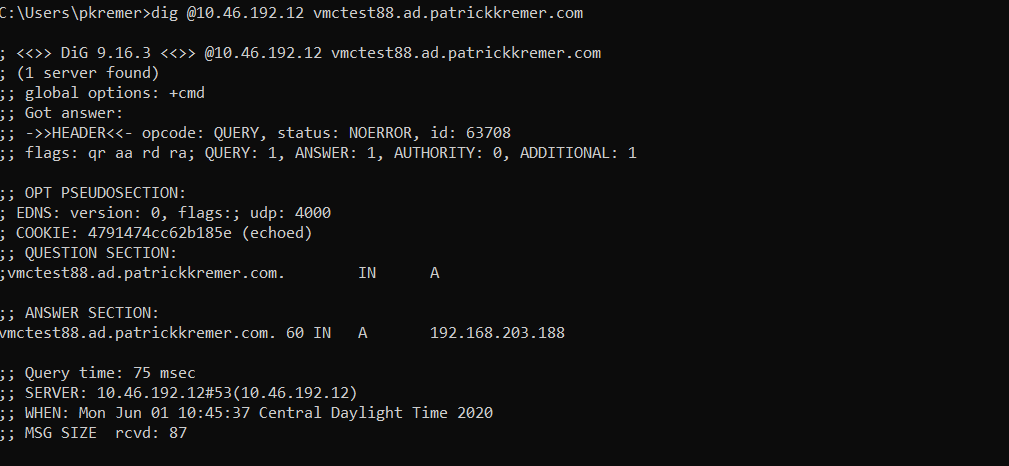
I do another lookup after the remaining 21 seconds expire and you can see a fresh record was pulled with a new TTL of 60 seconds.
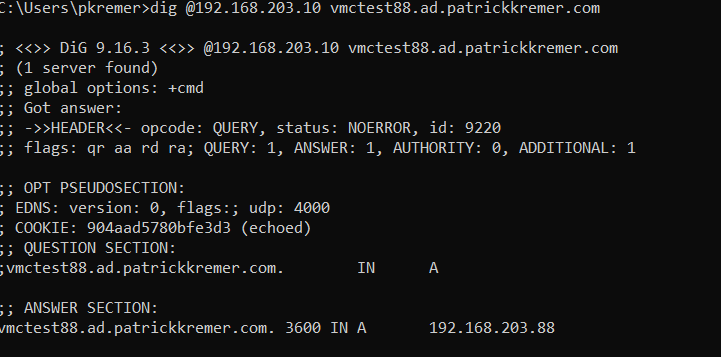
Let’s make a change. I update vmctest88 to point to 192.168.203.88 instead of .188, and I update the TTL to 1 hour.
On-prem results:
VMC results:
This will be cached for 1 hour in VMC.
I switch it back to .188 with a TTL of 60 seconds on-prem, which is reflected instantly

But in VMC, the query still returns the wrong .88 IP, with the TTL timer counting down from 3600 seconds (1 hour)
My customer had the same caching problem problem, except their cached TTL was 3 days and we couldn’t wait for it to fix itself. We needed to clear the DNS resolver cache. In order to do that, we go to the API. A big thank you to my coworker Matty Courtney for helping me get this part working.
You could, of course, do this programmatically. But if consuming APIs in Python isn’t your thing, you can do it from the UI. Go to the Developer Center in the VMC console, then API explorer. Pick your Org and SDDC from the dropdowns.
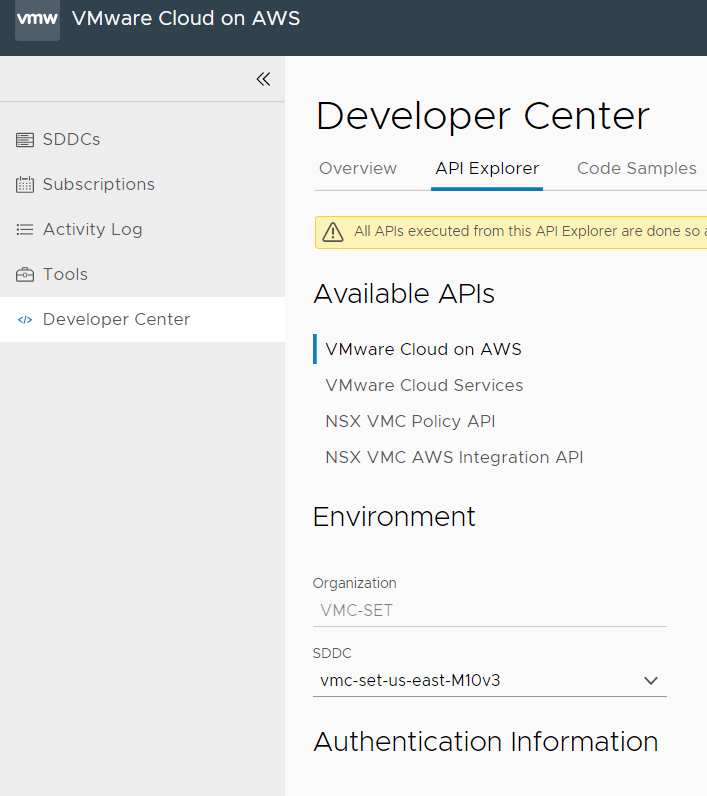
Click on the NSX VMC Policy API
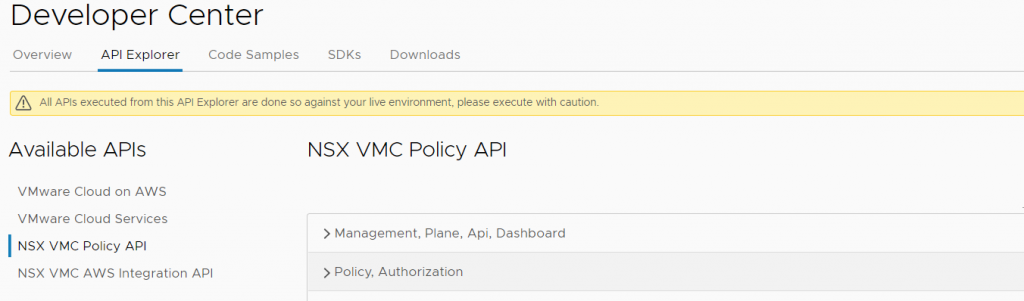
In the NSX VMC Policy API, find Policy, Networking IP, Management, DNS, Forwarder, then this POST operation on the tier-1 DNS forwarder
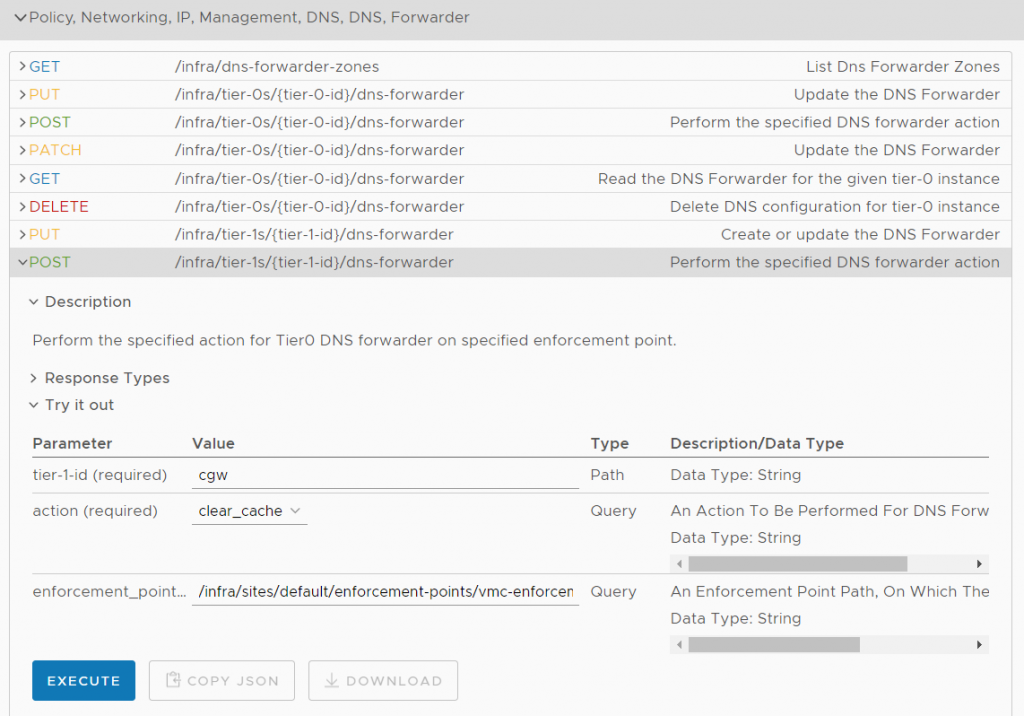
Fill out the parameter values:
tier-1-id: cgw
action: clear_cache
enforcement_point: /infra/sites/default/enforcement-points/vmc-enforcementpoint
Click Execute
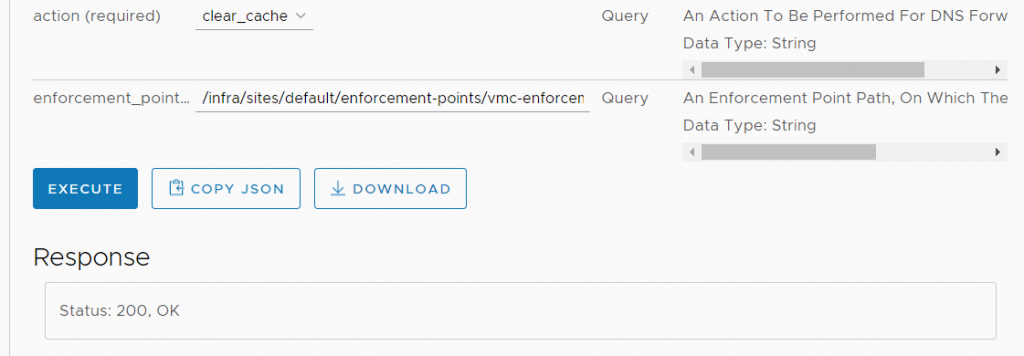
We see Status: 200, OK – success on the clear cache operation. We do another dig against the VMC DNS server – even though we were still within the old 1 hour cache period, the cache has been cleared. The VMC DNS server pulls the latest record from my homelab, we see the correct .188 IP with a new TTL of 60 seconds.
PCI configuration in VMC on AWS release 1.14 -
[…] must set this connectivity up before disabling the N&S tab. For this lab exercise, I set up a policy-based IPSEC VPN to my […]