In the previous post, we discussed Let’s Encrypt public certificates in VEBA. In the next few posts, we will discuss building a brand new PowerCLI function.
A Knative PowerCLI function template was committed to the repo in February 2022, and was released in 0.7.2. This template makes it easy to build a brand new function complete with a full set of documentation. This post walks through the process of using the template to build the kn-pcli-pg-check function, which was published in March 2022.
If you come from a traditional sysadmin background, this post may seem daunting to you. In my sysadmin days I would cobble together some PowerCLI and as long as it worked, I used it. I rarely documented outside of a comment here or there. Lack of documentation made it difficult for others to work with the code. Lack of structured error handling made it difficult to debug.
The steps below enforce a set of production-grade practices around your function development. You should make the code as bulletproof as possible, and you should approach your documentation with the same type of rigor as your code. Consider building your code and documentation as a unit – they are both important.
Step 1 – Prereqs
- Follow the instructions in Sample Code Prereqs to install the necessary tools on your workstation
- If there is any chance that you’re going to contribute your function back, make sure to fork your repo – this post covers everything you need to contribute. Open source needs contributions to survive – I strongly recommend that you contribute back
- Follow the first set of instructions in Deploying the Echo Function to clone the code repo to your workstation
Step 2 – Plan the function
You can’t write a function unless you know the business requirements you need to solve for. I wanted a function to monitor PCI virtual machines, ensuring they stay on a PCI portgroup. If they are moved off of a PCI portgroup, send a Slack alert.
Requirements list:
- Use vCenter tags to tag virtual machines as PCI
- Use vCenter tags to tag portgroups as PCI
- Monitor all vNICs on any PCI VM
- Send a Slack alert any time a PCI VM is moved off of a PCI portgroup
- Allow the function user to specify PCI tags and Slack notification settings via variable
You then need to determine which event to trigger the function from. You may not know the event name in this step, but you should know which vCenter operation you need to perform. In this case, I’m interested in checking a VM any time somebody edits the VM settings.
Step 3 – vCenter prereqs
Configuring vCenter will vary by function. If you are trying to trigger with a Power On or Power Off event, you will need a test VM. If you are trying to trigger on a distributed virtual switch event, you will need a distributed virtual switch. The function we’re working with today has a fair amount of setup we need to do ahead of time.
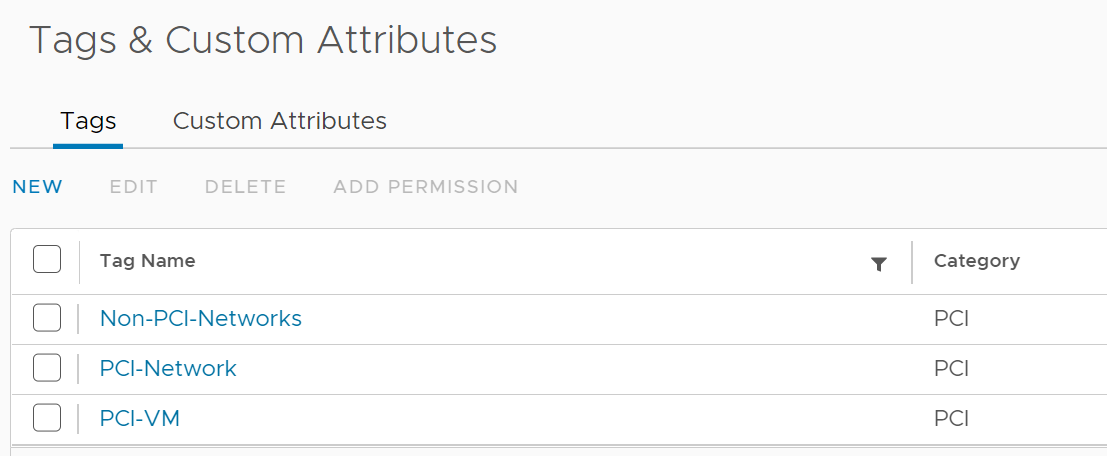
Tags:
- New Tag Category named `PCI`
- New Tag named `PCI-VM` in Category `PCI`
- New Tag named `PCI-VM2` in Category `PCI
- New Tag named `PCI-Network` in Category `PCI`
- New Tag named `PCI-Network2` in Category `PCI`
Port Groups
- New Distributed Virtual Port group named `DVS_PG_PCI_01`, tagged with `PCI/PCI-Network`
- New Distributed Virtual Port group named `DVS_PG_PCI_02`, tagged with `PCI/PCI-Network`
- New Distributed Virtual Port group named `DVS_PG_NOT_PCI`, no vSphere tag
- Existing Standard Virtual Port group named `VSS_VM_VLAN_203`, no vSphere tag
- This was an existing port group that was already in my lab. You might have to make one yourself
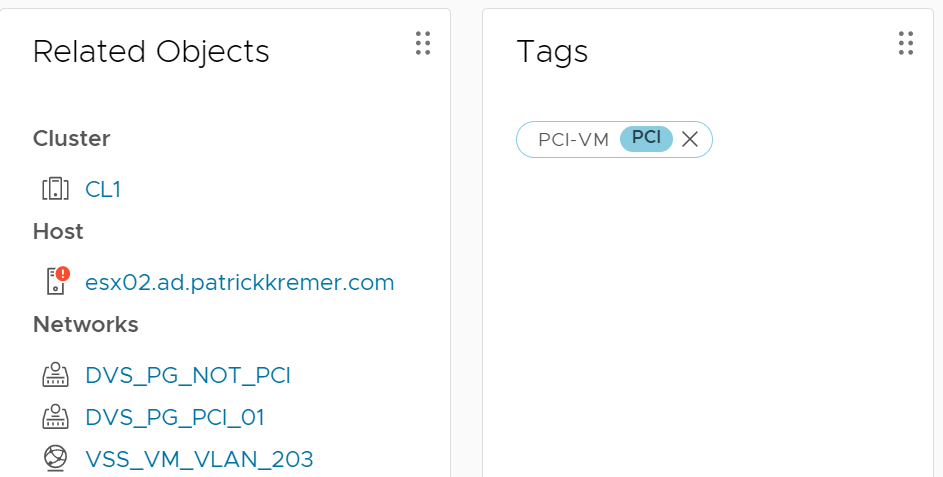
VM
- New Virtual Machine named `tinycore-2`, tagged with `PCI/PCI-VM`
- Network Adapter 1 assigned to `DVS_PG_PCI_01`
- Network Adapter 2 assigned to `VSS_VM_VLAN_203`
- Network Adapter 3 assigned to `DVS_PG_NOT_PCI`
I usually use Tiny Core Linux for my test VMs because it’s… well, tiny. Here is what tinycore-2 looks like:
Step 4 – Duplicate the template directory
I strongly recommend creating a branch instead of writing code directly in the development branch.
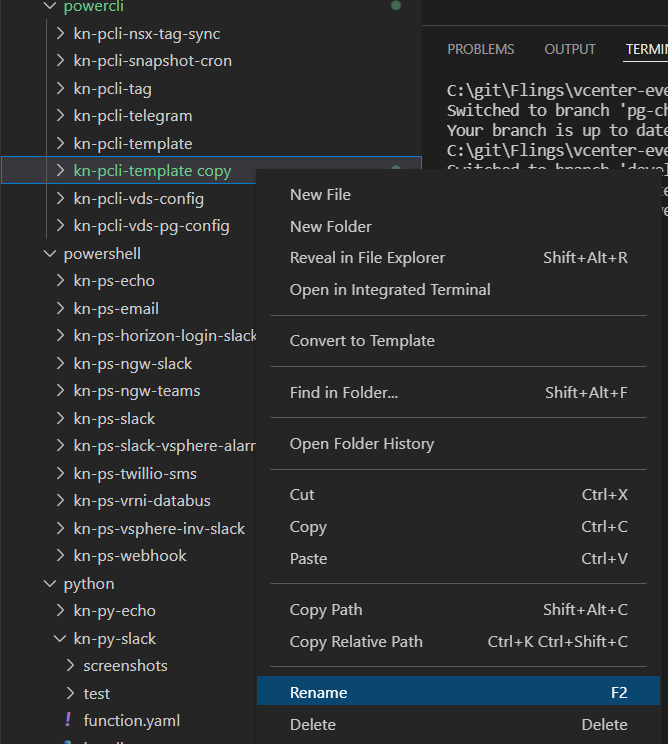
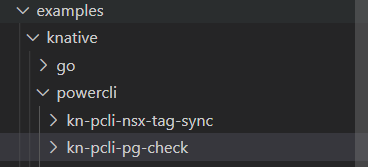
git checkout -b kn-pcli-pg-checkPowerCLI examples are found in ‘/examples/knative/powercli’. The template function is named ‘kn-pcli-template’. You can copy/paste the folder in Visual Sudio code.

You now have a copy named ‘kn-pcli-template copy’

Step 5 – Function Name
Come up with a descriptive name for your function, then rename the folder. I went with ‘kn-pcli-pg-check’ because the function checks VM portgroups for compliance.
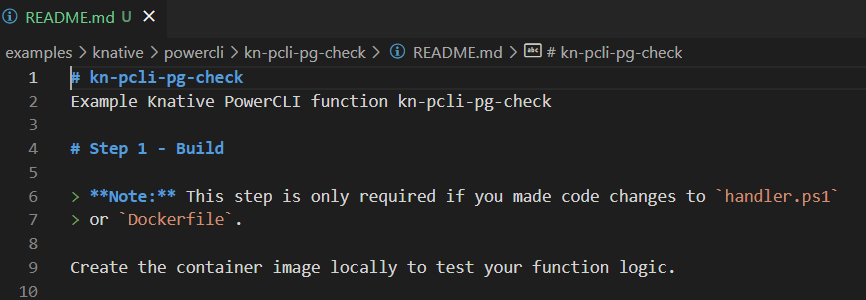
Step 6 – README file
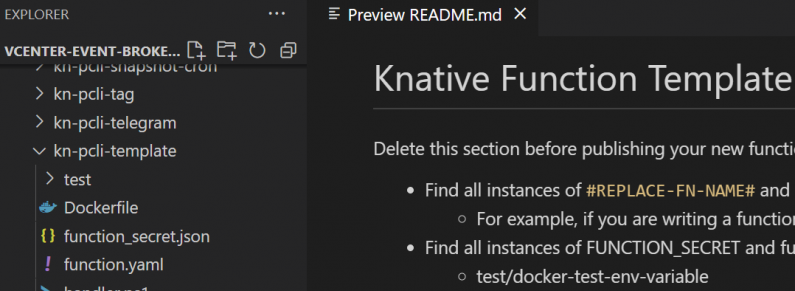
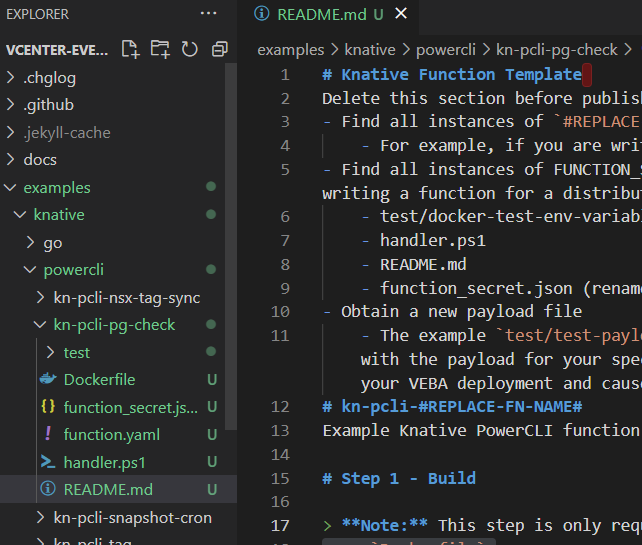
If you double-click the ‘README.md’ file, VS Code will show you the raw markdown.
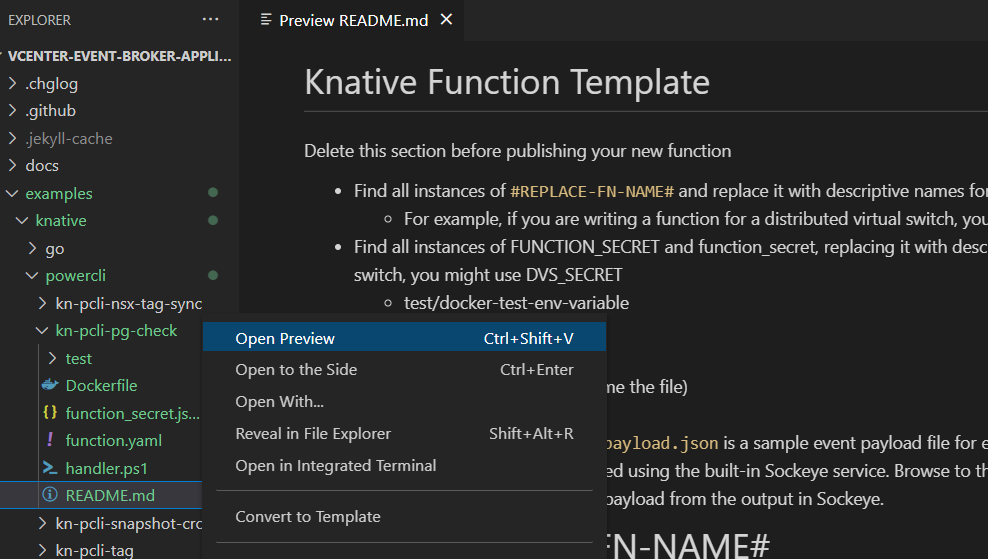
If you right-click and select Open Preview, it will show you the rendered markdown.
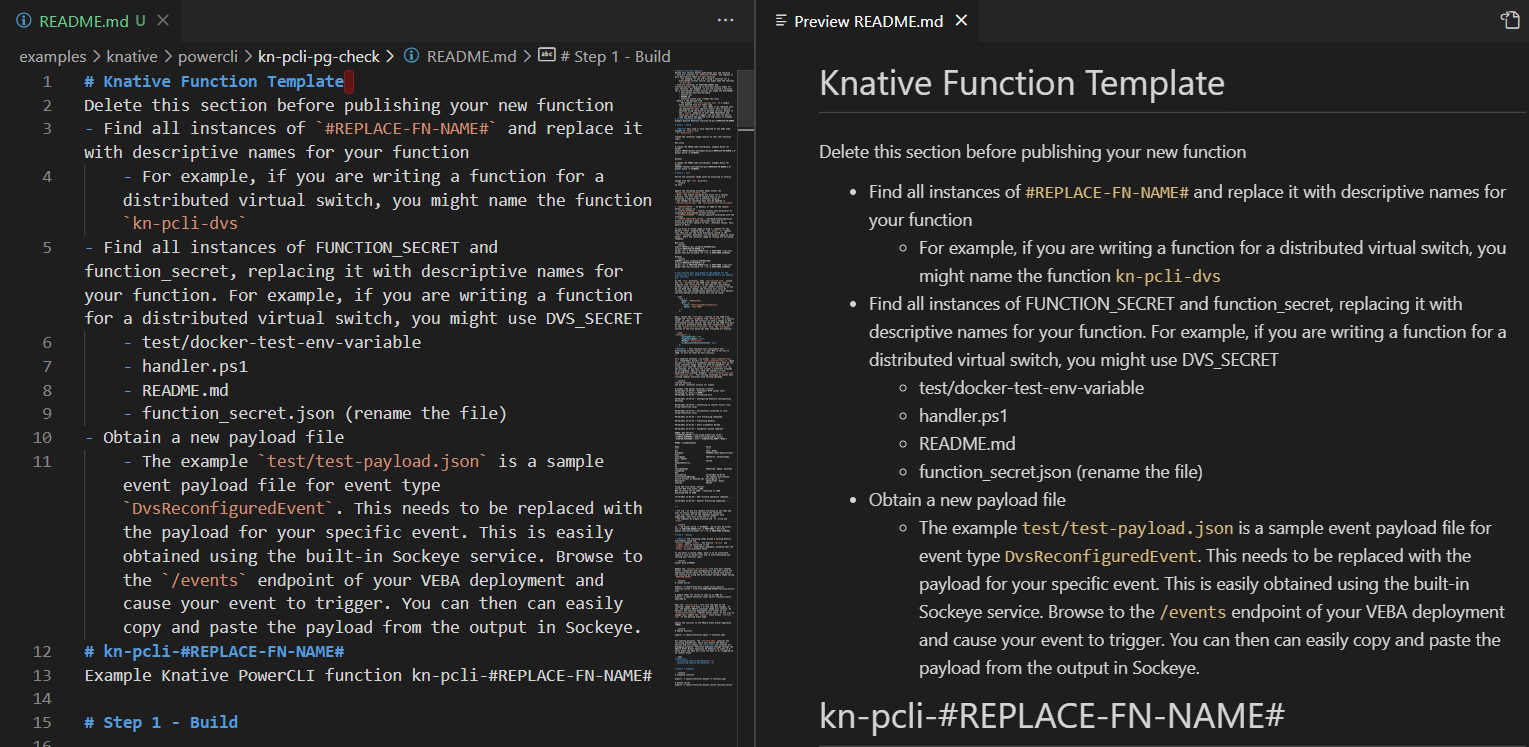
If you want to see raw and rendered side-by-side, you can double-click ‘README.md’, then click on Open Preview to the Side button

The README file in a function contains instructions on how to use the function. In the template, the README gives you a structure for building out a complete README for your new function.
Step 6a – Rename Function
The first section of the template instructs you to do the following:
- Find all instances of `#REPLACE-FN-NAME#` and replace it with descriptive names for your functionThis is easily accomplished with the search and replace function in VS Code. In this case I replace ‘#REPLACE-FN-NAME#’ with ‘pg-check’.
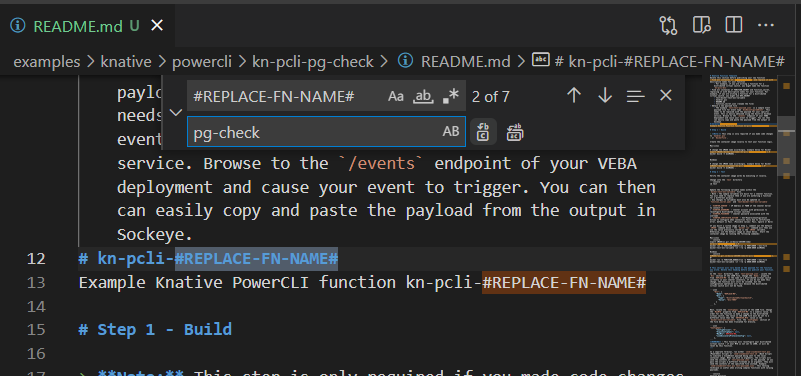
The file is now updated with the correct function name.
Step 6b – Replace FUNCTION_SECRET
Next, the README says to find FUNCTION_SECRET in all of the specified files and replace it with a descriptive name. You also need to rename the JSON file.
- Find all instances of FUNCTION_SECRET and function_secret, replacing it with descriptive names for your function. For example, if you are writing a function for a distributed virtual switch, you might use DVS_SECRET
	- test/docker-test-env-variable
	- handler.ps1
	- README.md
	- function_secret.json (rename the file)
I do a search and replace in all of the files, replacing ‘FUNCTION_SECRET’ with ‘PG_CHECK_SECRET’. I rename ‘function_secret.json’ to ‘pg_check_secret.json’
Step 6c – Payload
The final step at the top of the README says:
- Obtain a new payload fileThe sample payload included in the sample function is an event of type `DvsReconfiguredEvent`. If this happens to be the event payload you need, you’re in luck! You can skip to the next step. If not, you need a new payload file. Instead of triggering an event to happen every time you want to test your function code, you can use the payload file. It’s much faster to do this than to have to trigger the event every time.
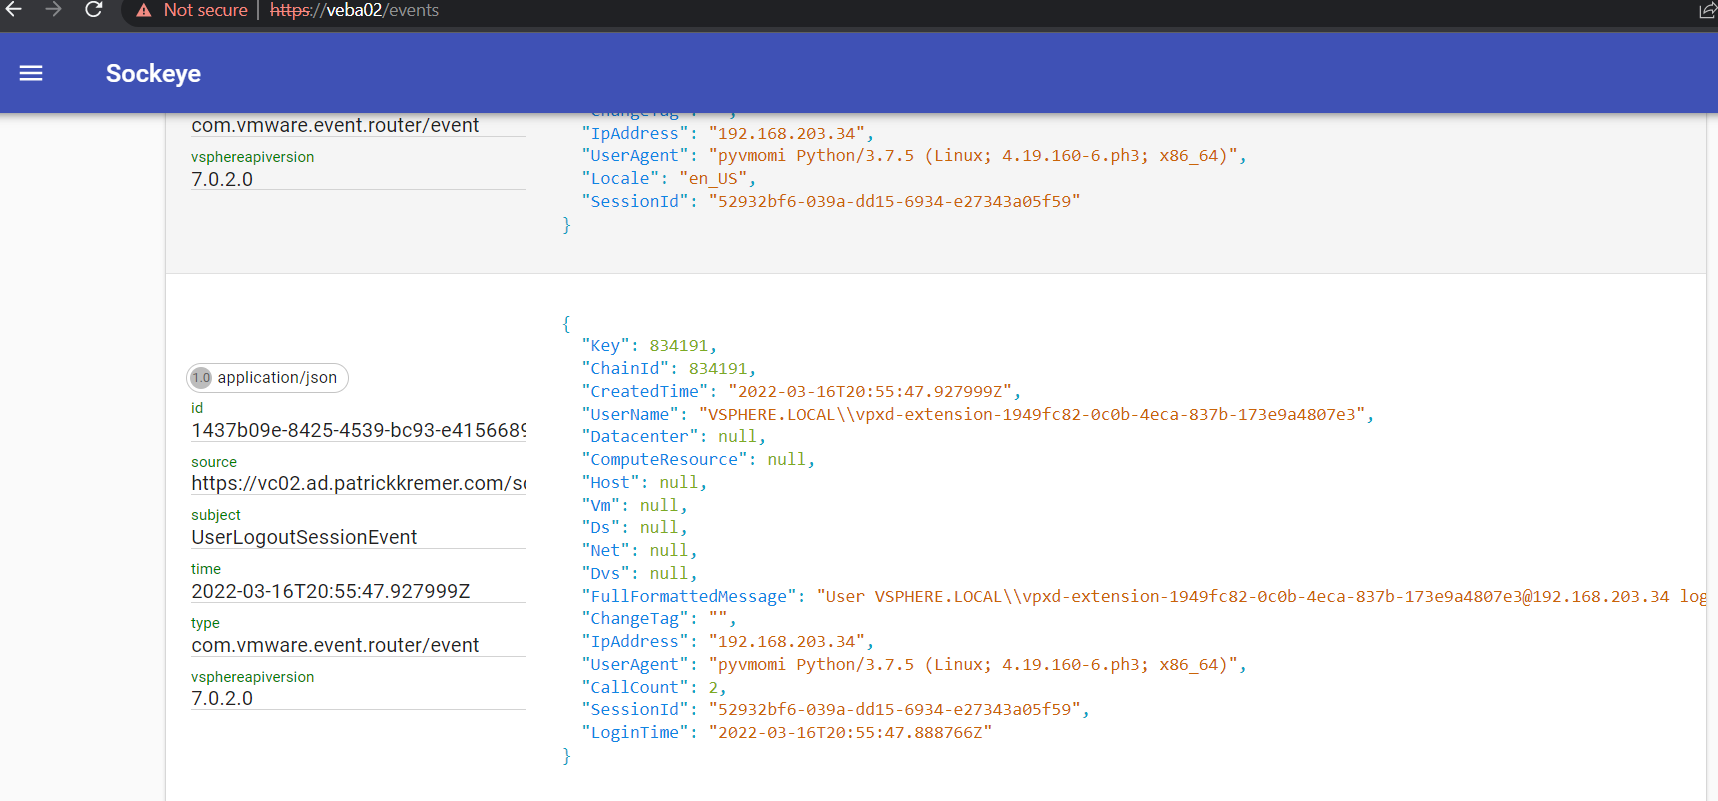
The VEBA appliance has the Sockeye service running under the /events endpoint. The Sockeye service is essentially a logfile tail command, showing you every event and payload that fires on your vCenter server.
I browse to the Sockeye service on my VEBA appliance – adding /events to my appliance URL. Events begin to scroll.
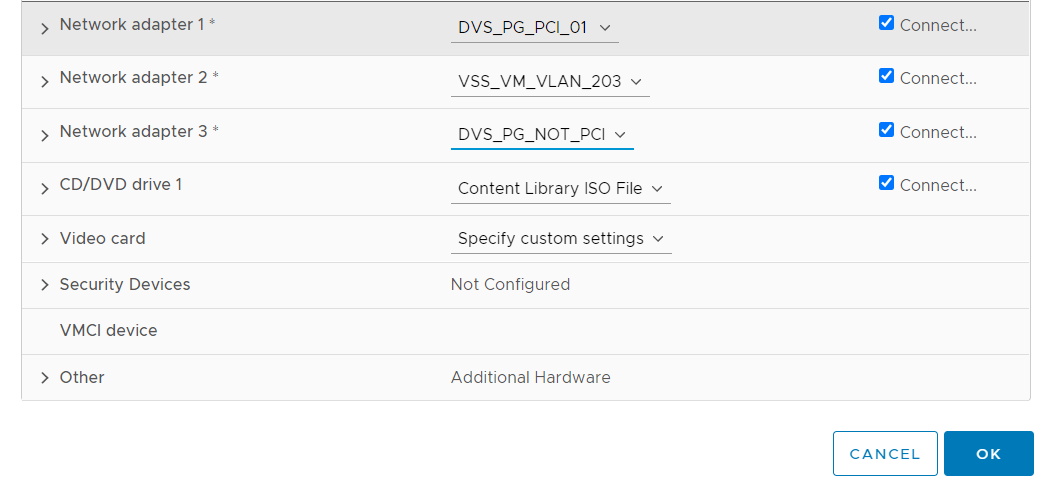
I edit VM ‘tinycore-2’ and set the vNIC portgroups as shown:
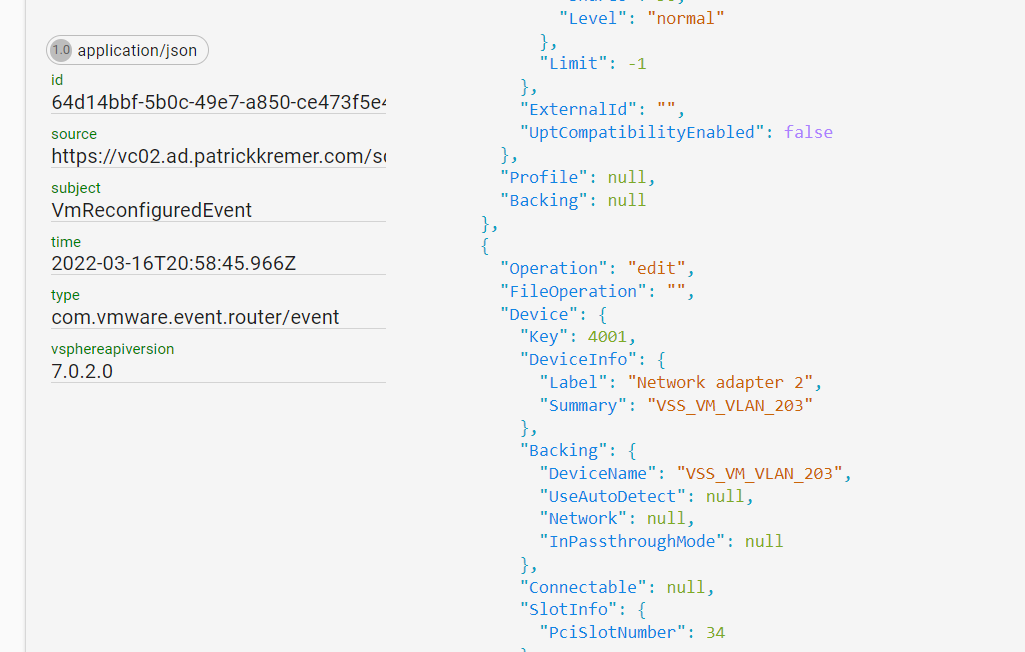
After clicking OK, I flip back to Sockeye and find an event subject ‘VmReconfiguredEvent’. The JSON shown is a small snippet of the entire payload. I copy and paste the entire payload, saving it into test/test-payload.json
Step 6d – Cleanup
Clean up the README by deleting the first set of instructions.

The top of the file should now start with the function name:
Step 7 – Environment Variables
test/docker-test-env-variable contains all of the variables necessary for testing of the function during development. The default in the template is shown below:
{"VCENTER_SERVER":"FILL-ME-IN","VCENTER_USERNAME":"FILL-ME-IN","VCENTER_PASSWORD":"FILL-ME-IN","VCENTER_CERTIFICATE_ACTION":"Ignore"}I know I need to connect to vCenter, so I keep those variables intact. I replace “FILL-ME-IN” with values that fit my environment. I need to add the following
- VM tags – I decide to name it VM_WATCH_TAGS. Unlike the other variables, I make it an array to support multiple tags
- Port group tags – I decide to name it PG_WATCH_TAGS. I also make it an array.
- Slack webhook URL and message – I take these variables directly from the existing Slack notification function kn-ps-slack
test/docker-test-env-variable now looks like this:
{"VCENTER_SERVER":"vc02.ad.patrickkremer.com","VCENTER_USERNAME":"administrator@vsphere.local","VCENTER_PASSWORD":"FILL-ME-IN","VCENTER_CERTIFICATE_ACTION":"Ignore","VM_WATCH_TAGS":["PCI/PCI-VM","PCI/PCI-VM2"],"PG_WATCH_TAGS":["PCI/PCI-Network","PCI/PCI-Network2"],"SLACK_WEBHOOK_URL":"https://hooks.slack.com/services/FILL-ME-IN","SLACK_MESSAGE_PRETEXT":"Virtual Machine - Portgroup Alert"}Step 7 – Writing and testing function code
Code for your function begins at line 78 of ‘handler.ps1’. Open this file in VS Code.
   #
   # Your custom code goes here
   #
   # When sending messages back to the console, please conform to the following standards:
   # Write-Host "$(Get-Date) - DEBUG: "
   # Write-Host "$(Get-Date) - WARN: "
   # Write-Host "$(Get-Date) - ERROR: "

   # This is the final line of your custom code.
   # Replace #REPLACE-ME# with a meaningful message showing the end of your custom code
   #Write-Host "$(Get-Date) - #REPLACE-ME# operation complete ...`n"
We will discuss the details of the code in ‘kn-pcli-pg-check’ in the next post. For now, we will go through the steps to iterate through your code and test it along the way.
When writing a new PowerCLI function, I will typically run some cmdlet to prove that I have all of the variables correct and that I am able to connect to vCenter. In this instance, I used the Get-VM cmdlet to retrieve the power state of ‘tinycore-2’. These lines of code get added to ‘handler.ps1’ (the Handler Processing Completed message was already in the template).
   Write-Host "$(Get-Date) - PowerState: $((get-vm "tinycore-2").PowerState) ...`n"

   Write-Host "$(Get-Date) - PG Check operation complete ...`n"

   Write-Host "$(Get-Date) - Handler Processing Completed ...`n"
Now, create a variable to store your image name and tag, then build and run the image.
$IMAGE='kremerpatrick/kn-pcli-pg-check:1.0'
docker build -t ${IMAGE} .
cd test
docker run -e FUNCTION_DEBUG=true -e PORT=8080 --env-file docker-test-env-variable -it --rm -p 8080:8080 ${IMAGE}
The image builds – the initial build can take a while as the base container image is downloaded for the first time.
C:\git\Flings\vcenter-event-broker-appliance\examples\knative\powercli\kn-pcli-pg-check [pg-check ≡ +0 ~4 -0 !]> docker build -t ${IMAGE} .
[+] Building 0.6s (7/7) FINISHED
=> [internal] load build definition from Dockerfile 0.0s
=> => transferring dockerfile: 31B 0.0s
=> [internal] load .dockerignore 0.0s
=> => transferring context: 2B 0.0s
=> [internal] load metadata for us.gcr.io/daisy-284300/veba/ce-pcli-base:1.4 0.4s
=> [internal] load build context 0.0s
=> => transferring context: 2.67kB 0.0s
=> CACHED [1/2] FROM us.gcr.io/daisy-284300/veba/ce-pcli-base:1.4@sha256:2412ecb966821fe99cc227cefac5ff115d841b9da28bb8f7b67e9be55042a885 0.0s
=> [2/2] COPY handler.ps1 handler.ps1 0.0s
=> exporting to image 0.0s
=> => exporting layers 0.0s
=> => writing image sha256:a3d229fa5f38f14aac67f0866f5b031ca622704ae983bd2206a47c74598032ef 0.0s
=> => naming to docker.io/kremerpatrick/kn-pcli-pg-check:1.0 0.0s
C:\git\Flings\vcenter-event-broker-appliance\examples\knative\powercli\kn-pcli-pg-check [pg-check ≡ +0 ~4 -0 !]> cd test
C:\git\Flings\vcenter-event-broker-appliance\examples\knative\powercli\kn-pcli-pg-check\test [pg-check ≡ +0 ~4 -0 !]> docker run -e FUNCTION_DEBUG=true -e PORT=8080 --env-file docker-test-env-variable -it --rm -p 8080:8080 ${IMAGE}
03/16/2022 22:34:06 - PowerShell HTTP server start listening on 'http://*:8080/'
03/16/2022 22:34:06 - Processing Init
03/16/2022 22:34:06 - Configuring PowerCLI Configuration Settings
DefaultVIServerMode : Multiple
ProxyPolicy : UseSystemProxy
ParticipateInCEIP : True
CEIPDataTransferProxyPolicy : UseSystemProxy
DisplayDeprecationWarnings : True
InvalidCertificateAction : Ignore
WebOperationTimeoutSeconds : 300
VMConsoleWindowBrowser :
Scope : Session
DefaultVIServerMode :
ProxyPolicy :
ParticipateInCEIP : True
CEIPDataTransferProxyPolicy :
DisplayDeprecationWarnings :
InvalidCertificateAction : Ignore
WebOperationTimeoutSeconds :
VMConsoleWindowBrowser :
Scope : User
DefaultVIServerMode :
ProxyPolicy :
ParticipateInCEIP :
CEIPDataTransferProxyPolicy :
DisplayDeprecationWarnings :
InvalidCertificateAction :
WebOperationTimeoutSeconds :
VMConsoleWindowBrowser :
Scope : AllUsers
03/16/2022 22:34:07 - Connecting to vCenter Server vc02.ad.patrickkremer.com
IsConnected : True
Id : /VIServer=vsphere.local\administrator@vc02.ad.patrickkremer.com:443/
ServiceUri : https://vc02.ad.patrickkremer.com/sdk
SessionSecret : "272e702129302c3ebf1b9f8b58ed47fb94739ebb"
Name : vc02.ad.patrickkremer.com
Port : 443
SessionId : "272e702129302c3ebf1b9f8b58ed47fb94739ebb"
User : VSPHERE.LOCAL\Administrator
Uid : /VIServer=vsphere.local\administrator@vc02.ad.patrickkremer.com:443/
Version : 7.0.2
Build : 17920168
ProductLine : vpx
InstanceUuid : 9db92255-bc00-4e91-9777-0e37928c5771
RefCount : 1
ExtensionData : VMware.Vim.ServiceInstance
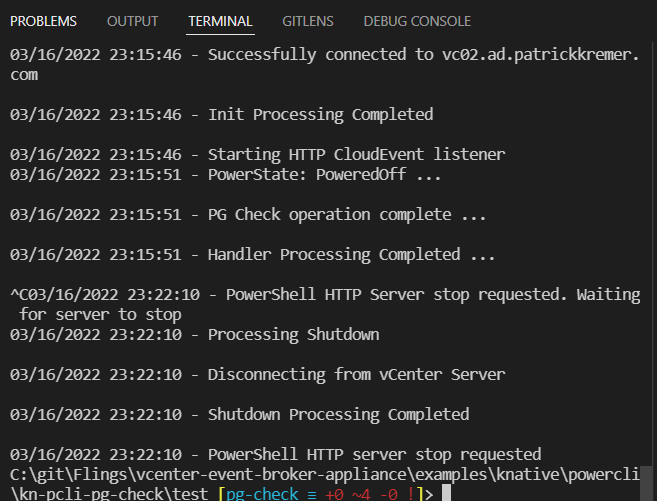
03/16/2022 22:34:09 - Successfully connected to vc02.ad.patrickkremer.com
03/16/2022 22:34:09 - Init Processing Completed
03/16/2022 22:34:09 - Starting HTTP CloudEvent listenerThe function is ready to accept a payload. A good way to do this is to use the split terminal function in VS Code
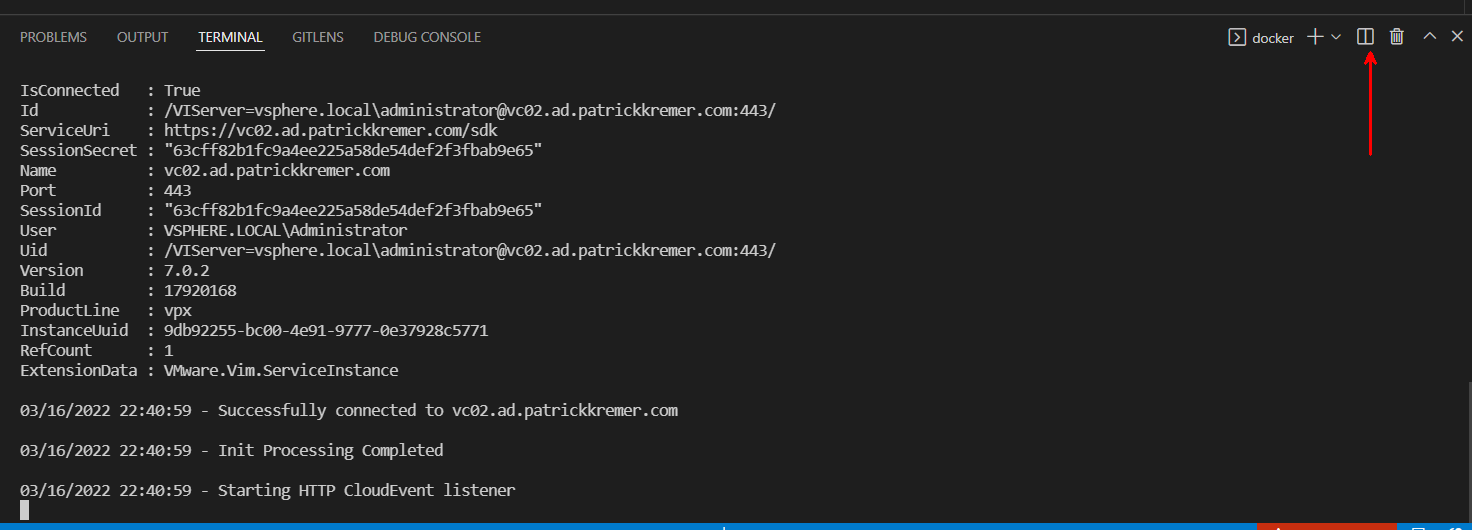
You now have the running container output on the left, and a terminal on the right.
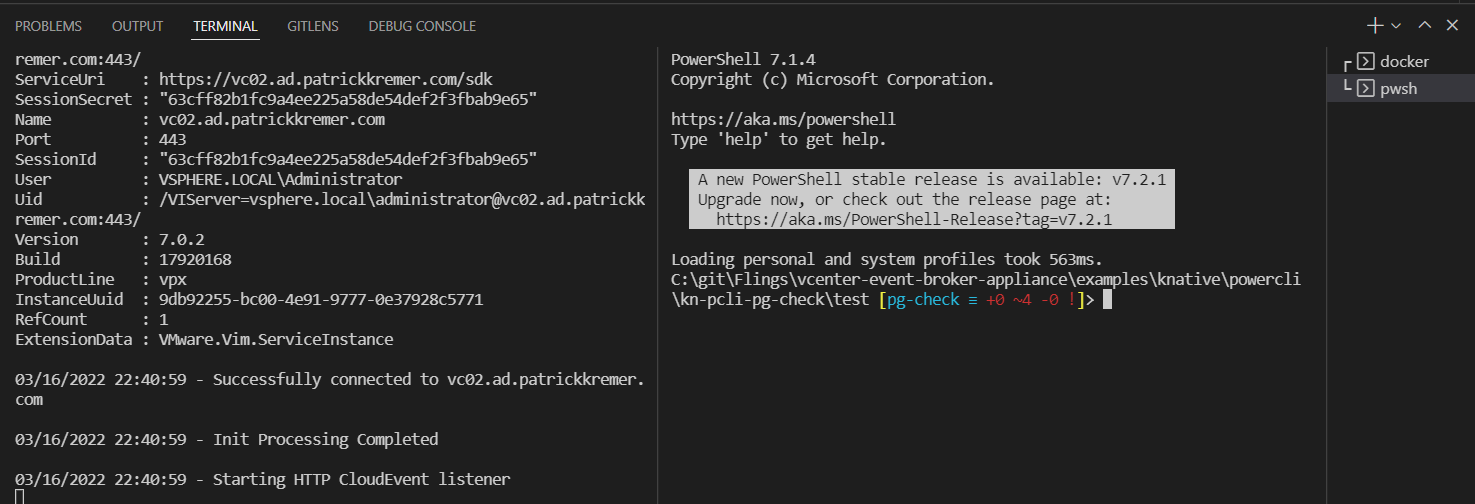
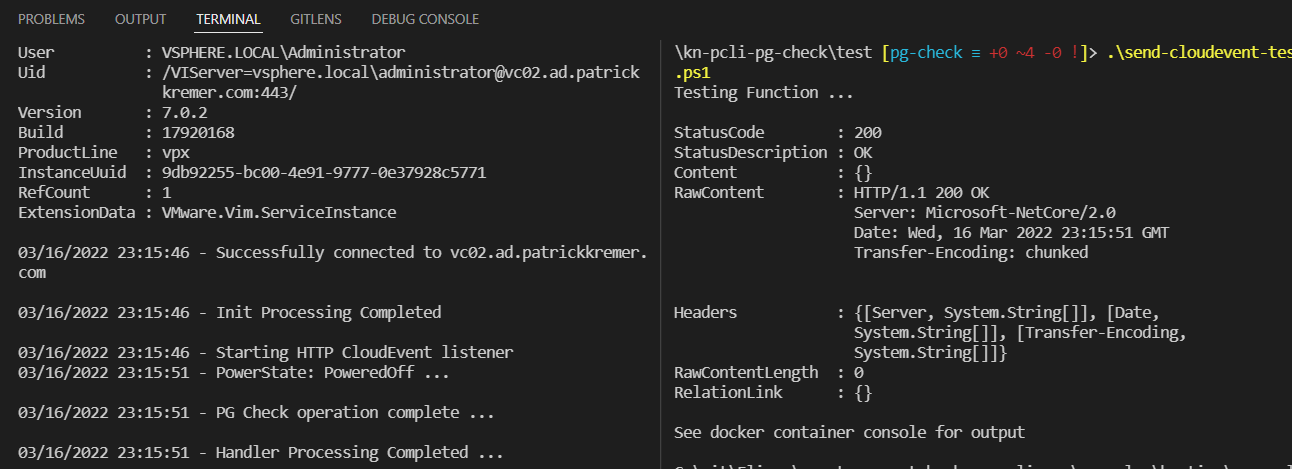
Send the payload with the send-cloudevent-test script.
\kn-pcli-pg-check\test [pg-check ≡ +0 ~4 -0 !]> .\send-cloudevent-test.ps1You will see the container output scrolling on the left, and the results of the test script on the right. Note that the output from the Get-VM cmdlet is visible – we now know that our function can connect to vCenter.
We can now begin to write our function. Any time you change code in ‘handler.ps1’, you have to rebuild the container. You can use Ctrl-C to break out of the process and terminate the current container.
Now, I change the code again by adding another line, displaying the number of vCPUs in the VM. I wouldn’t do this normally as the previous test is enough to continue with function development. But I’m showing it here to demonstrate how to rapidly change and test code.
 Write-Host "$(Get-Date) - PowerState: $((get-vm "tinycore-2").PowerState) ...`n"

 Write-Host "$(Get-Date) - CPUs: $((get-vm "tinycore-2").NumCPU) ...`n"

 Write-Host "$(Get-Date) - PG Check operation complete ...`n"

 Write-Host "$(Get-Date) - Handler Processing Completed ...`n"
To quickly build and run the container, you can chain all of the commands together with ampersands. You could run each command individually. But when you’re iterating on the code, it’s very fast to hit the up arrow, build the container, then run the test function.
cd .. && docker build -t ${IMAGE} . && cd test && docker run -e FUNCTION_DEBUG=true -e PORT=8080 --env-file docker-test-env-variable -it --rm -p 8080:8080 ${IMAGE}The container rebuilds.
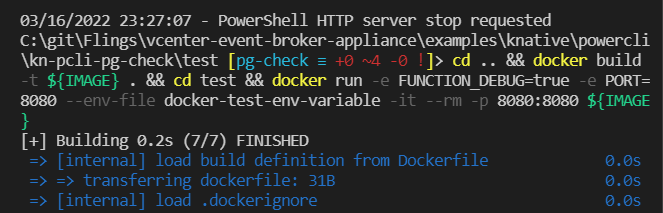
I run the send-cloudevent script again
\kn-pcli-pg-check\test [pg-check ≡ +0 ~4 -0 !]> .\send-cloudevent-test.ps1Now we see output from both lines – Power State and Num CPU.

We now have our environment ready and can move to writing the function. See the next post for a walkthrough of the actual function code.
VMware Event Broker Appliance – Part X – Building a New PowerCLI Function - Function Deployment -
[…] Part VIII, we configured environment variables in ‘test/docker-test-env-variable’. The same […]
VMware Event Broker Appliance – Part IX – Building a new PowerCLI Function - Writing Code -
[…] Part VIII, we prepared to write code for a new PowerCLI function using the PowerCLI template. In this post, […]