Update 2022-03-12 – Tom Twyman has a good post on using the PyVMC Fling to make route filtering configuration changes easier. Plus, the Fling is open source so if you’re looking to use the raw APIs yourself, you can see how the Fling accomplishes it. This post shows you how to use the raw API.
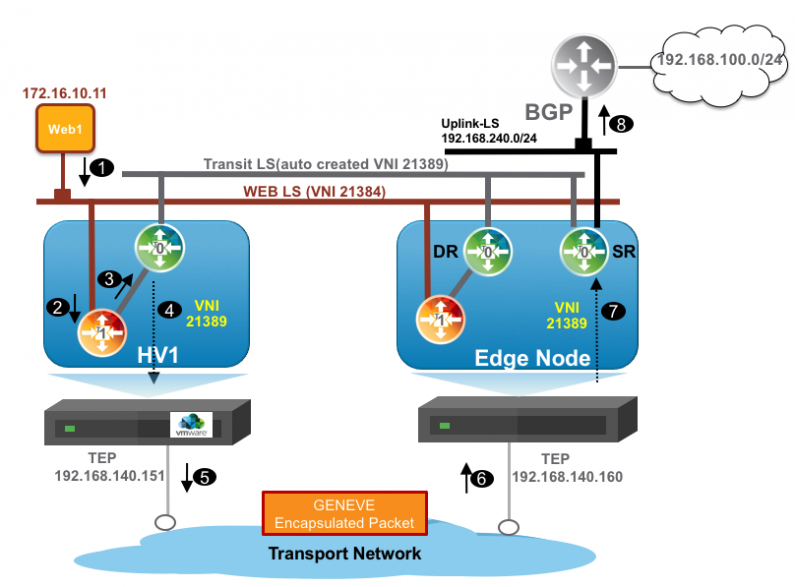
My customer has run into a situation with Mobility Optimized Networking. They have a DX carrying HCX replication traffic, but their management runs across an IPSEC VPN. IPSEC VPNs in VMC have a 100 route limit on them imposed by AWS. This is not an issue when running across a DX, only across a VPN. Part of how MON does its magic is by injecting a /32 route into the VMC T0 route table. As you might imagine, it doesn’t take long to reach 100 routes when you have many VMs with MON enabled. On the 101st route, AWS drops the VPN.
The resolution for this is BGP route filtering. This feature has been available in VMC for some time, but there is no way to do it in the GUI. The content in this post builds on excellent content from Gilles Chekroun and William Lam. Might want to grab a cup of coffee, this is a long post.
Testing Scenario
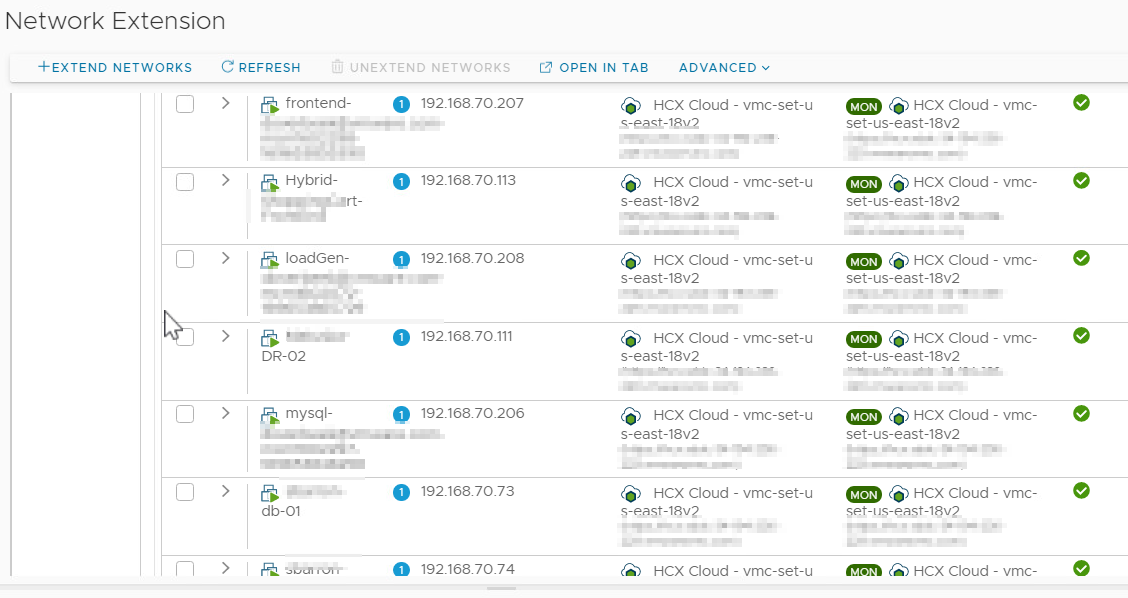
My test environment consists of numerous stretched, MON-enabled segments. For this post I want to filter out all of the /32 advertisements from a single subnet – 192.168.70.0/24
The easiest way to look at your NSX-T T0 route table is to use William Lam’s PowerShell module for interacting with the VMC NSX-T API. The NSX-T T0 route table contains the /32 routes as shown below
$RefreshToken = '<Your RefreshToken>'
Connect-VMC -RefreshToken $RefreshToken
Connect-NSXTProxy -RefreshToken $RefreshToken -OrgName <Your Org Name> -SDDCName <Your SDDC Name>
Get-NSXTRouteTable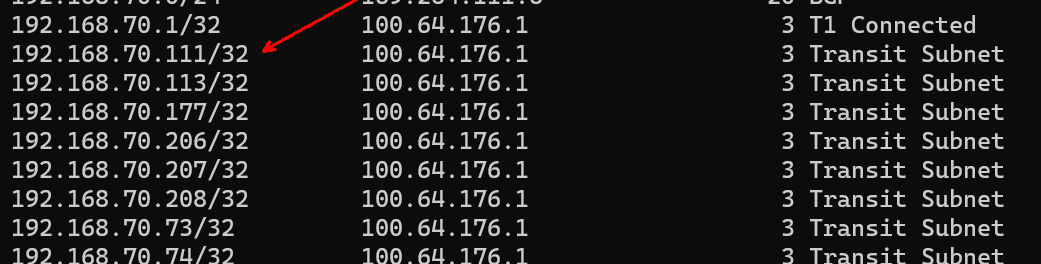
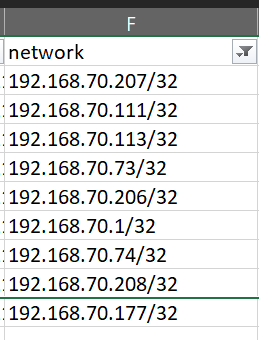
Now I look at my VPN configuration in VMC. I can download the advertised routes as shown.

I filter my file and find that all of my /32s from 192.168.70.0/24 are being advertised
Configuration Steps
First, generate an API token to access the VMC on AWS API.
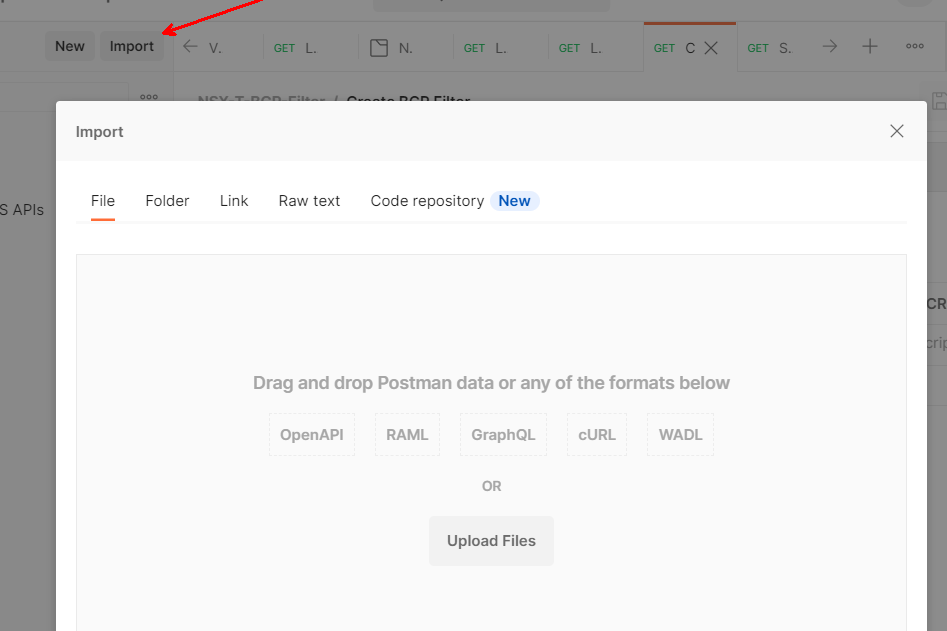
Then install Postman. It is possible, but difficult, to do all of this from within the VMC API explorer. I used Postman and suggest that you begin learning the tool if you’re going to do any work with APIs. Postman is designed for you easily work with APIs.
You can get the Postman collection and variables from here. Although development on the Postman downloads was discontinued in vSphere 7.0, the environment variables still work and the API calls that we use for this post still work. This is not to say that you can’t use Postman going forward – REST is open and you can use any tool or language capable of working with REST APIs. It just means that you’ll have to create the API calls yourself instead of being able to import a collection.
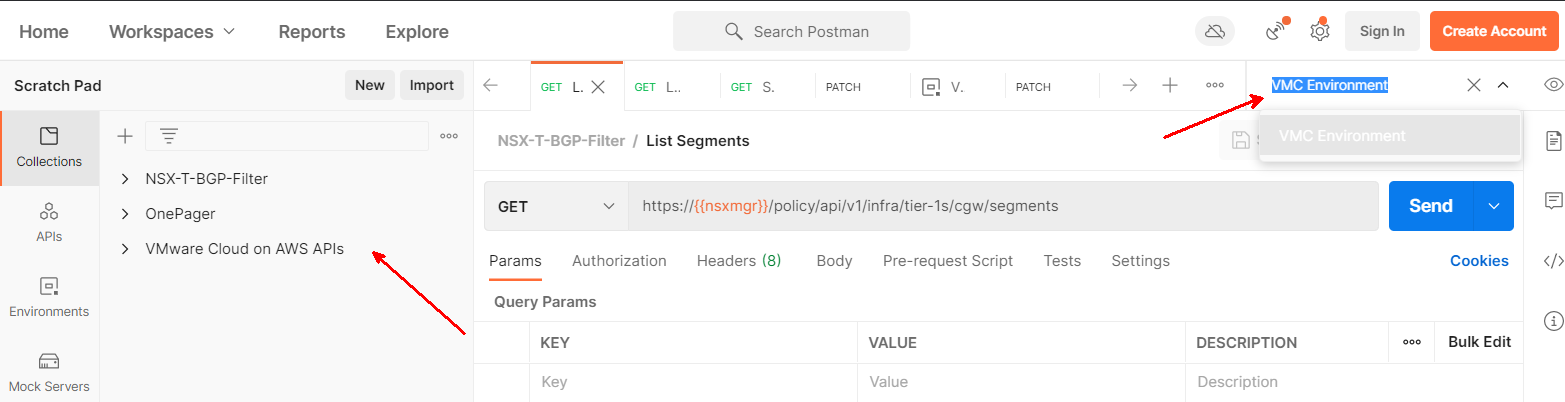
Extract VMC Environment.postman_environment.json and VMware Cloud on AWS APIs.postman_collection.json from the zip download, then import them into Postman
You will end up with a new VMware Cloud on AWS API collection, and a set of Environment variables called VMC Environment.
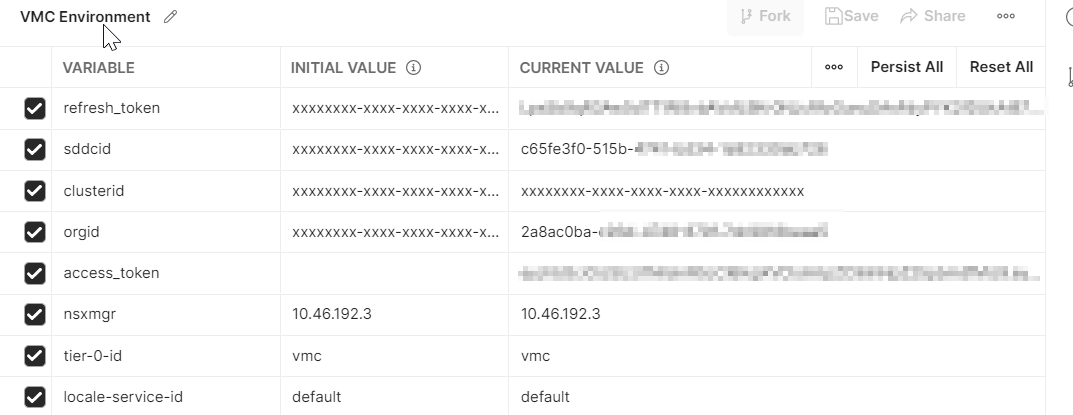
These values have already been edited, but right after importing the Environment both the initial and current values will be xxxxxx. Click the Edit button.
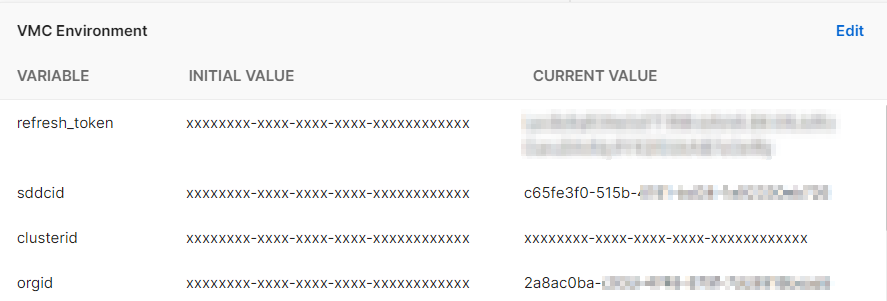
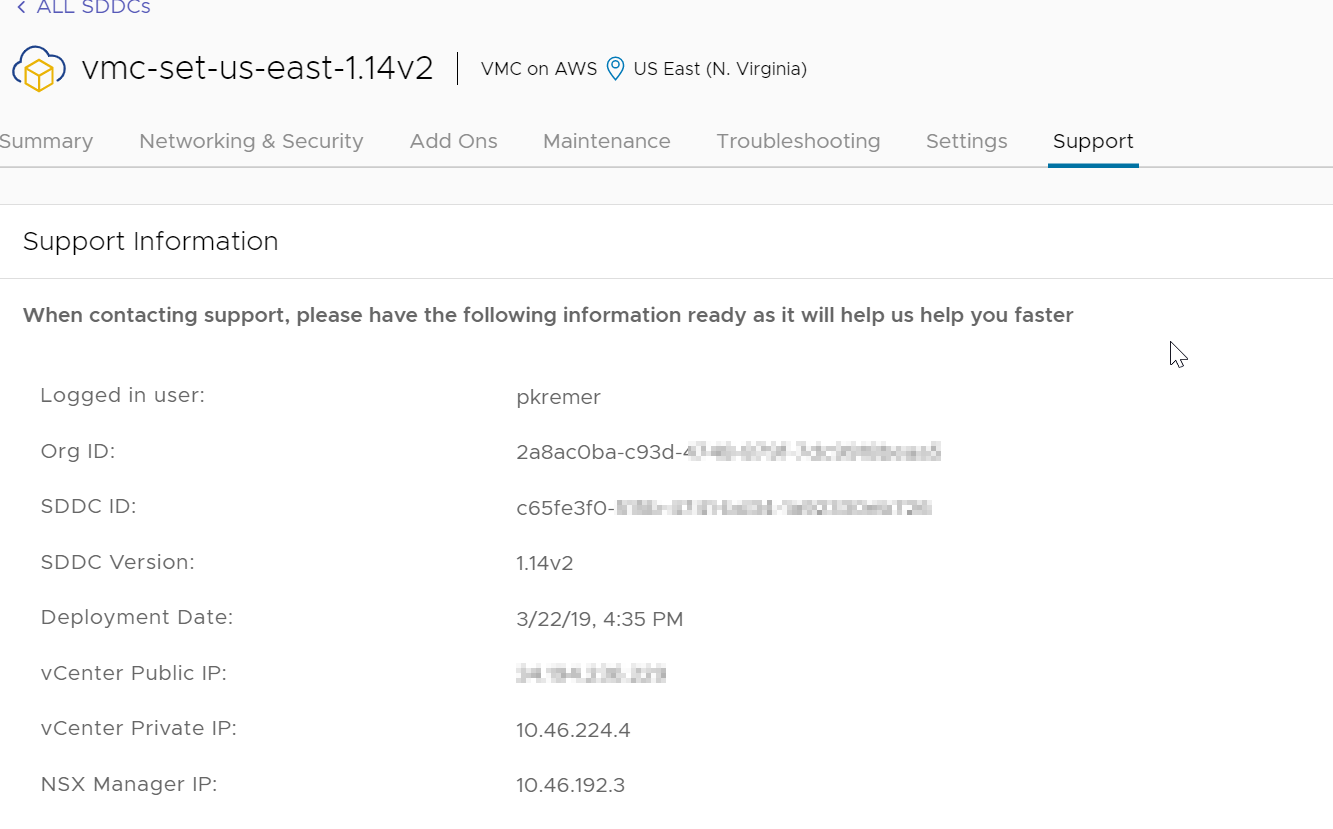
Update the current value of refresh_token with the token you generated above. The OrgID and SDDC ID can be found in the support tab of your SDDC. Make a note of your NSX Manager IP, you will need it later.

MAKE SURE TO HIT SAVE! It’s easy to miss and then you drive yourself crazy because things don’t work when they should.

I have posted the Postman collection and environment that I used in Github – if you don’t want to create all of the API calls manually, you can try importing these files.
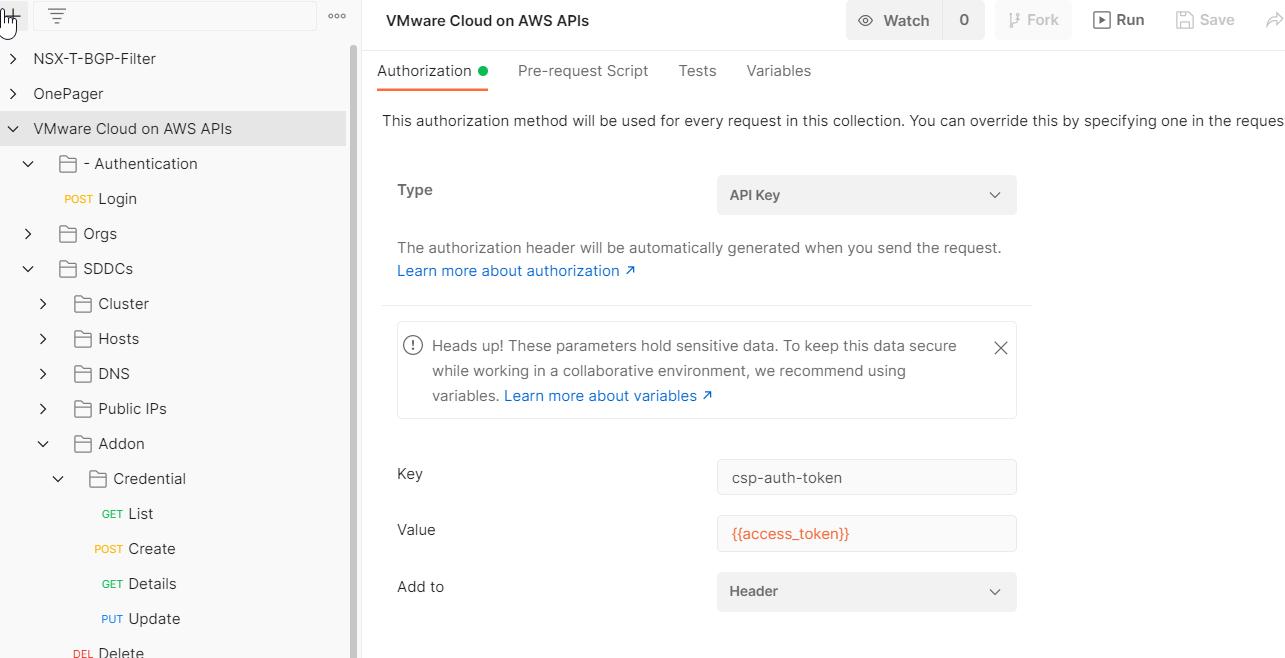
Click on the VMware Cloud on AWS APIs collection, then click the Authorization tab. Authorization Type should be API Key, the key should be csp-auth-token, value of {{access_token}}, and Add to should be set to Header.
Browse down to Authentication>Login. Click the Send button. You should get a 200 OK result.
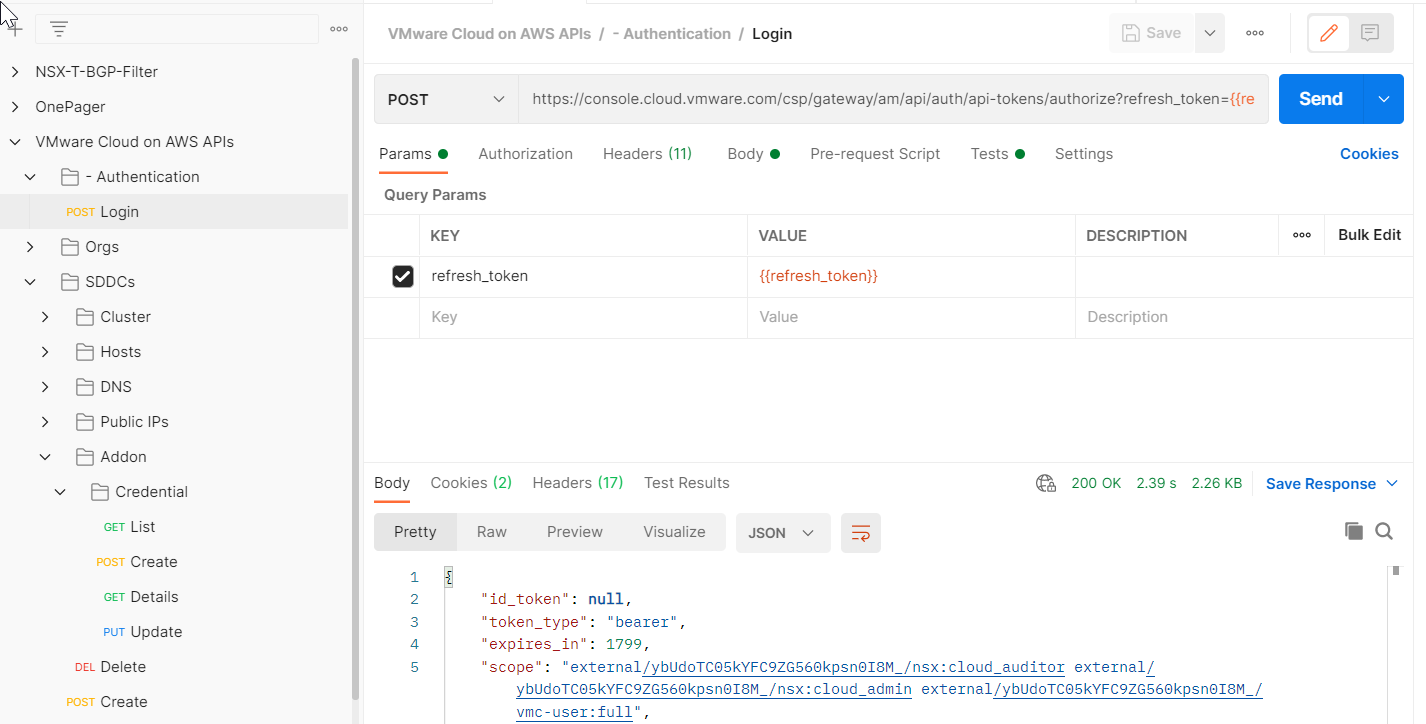
Look at your environment variables again – the Login call should have populated access_token with a value.
While you’re in here, add 3 more variables. Click Edit. Add variable nsxmgr and set the initial value to the IP address of your NSX manager that you retrieved from the support tab above. Set your tier-0-id to vmc. Set your locale-service-id to default
Now open your management gateway firewall to allow access from wherever you are running Postman to port 443 of NSX Manager. You can see in this example, the MGW firewall allows access from my VPN as well as the Horizon desktops my team uses to access the environment.

NSX-T API Calls
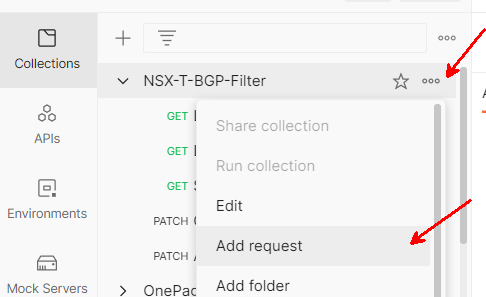
Create a new NSX-T collection, I named mine NSX-T-BGP-Filter. Alternatively, you can import the BGP Filter Collection I posted on Github.

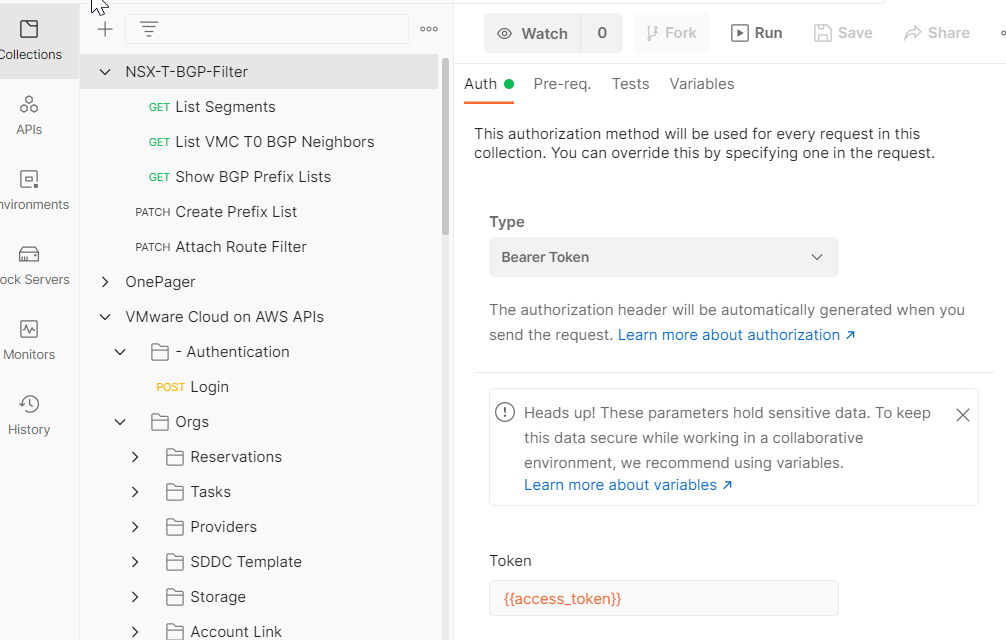
On the Auth tab, change the Type to Bearer Token, then set the token to {{access_token}}. This will automatically populate the authentication token with the value returned by the VMC on AWS Login call.
We are now going to execute the following via API calls
- Show the T0 BGP neighbor configuration
- Create a prefix list to filter out the /32s
- Show the prefix list
- Attach the prefix list to the T0 BGP neighbor
- Show the T0 BGP neighbor configuration again
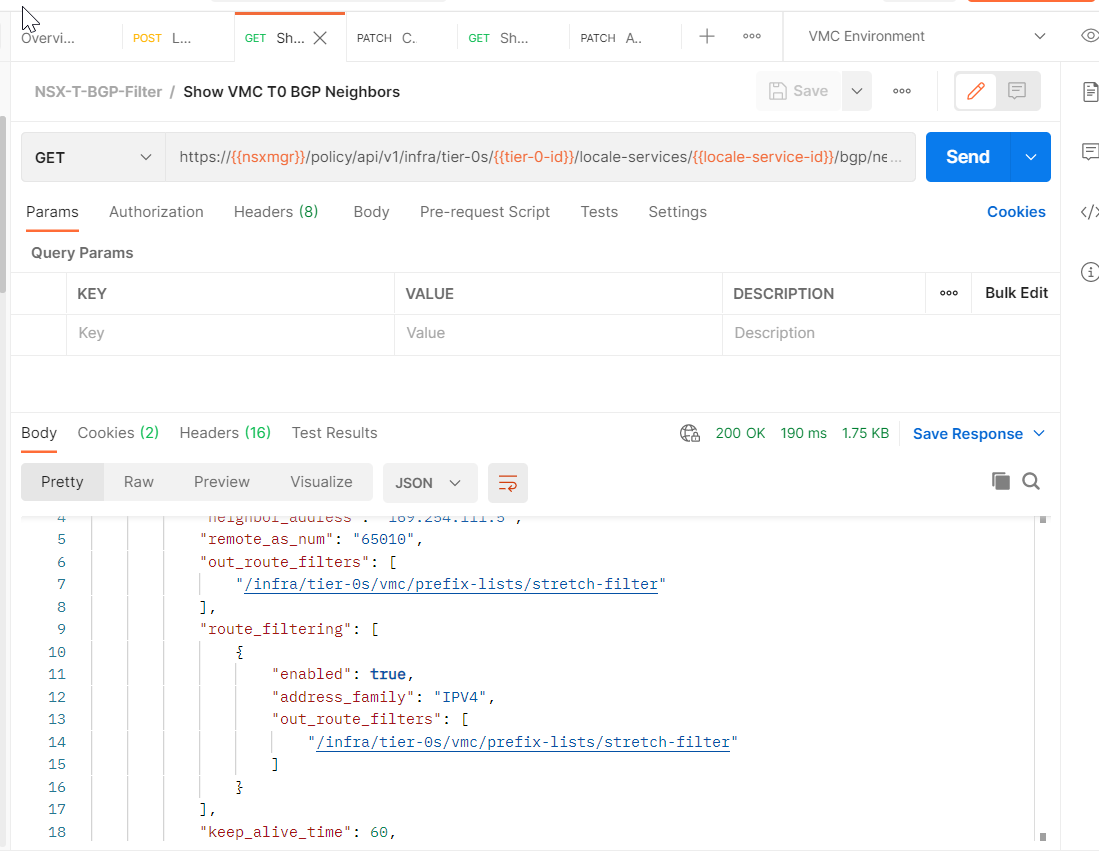
Show T0 BGP Neighbor
Add a new API request to the collection.
Name your request Show VMC T0 BGP Neighbors

Make it a GET request and paste the following URL in
https://{{nsxmgr}}/policy/api/v1/infra/tier-0s/{{tier-0-id}}/locale-services/{{locale-service-id}}/bgp/neighbors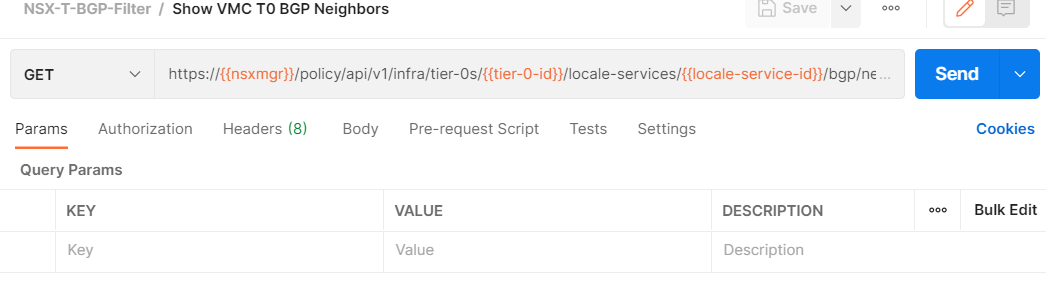
Click Send. If you get an error like this, the most likely cause is that your access token expired – you only get 1,800 seconds before it must be refreshed.
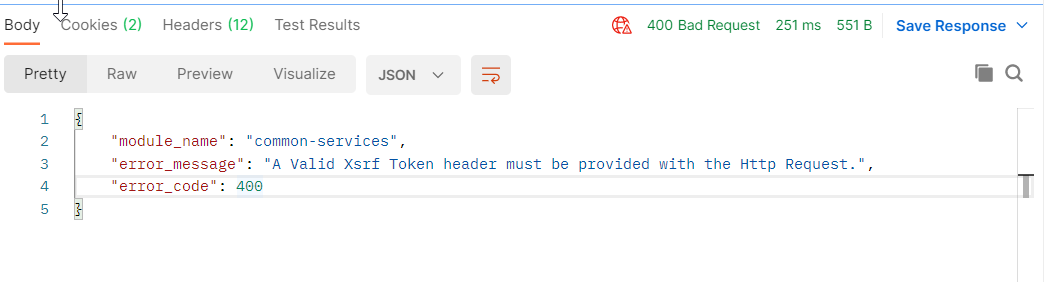
To resolve, switch back to the Login API call and run it again. Then come back to the Show VMC T0 BGP Neighbors tab, run it again, and you should get results.
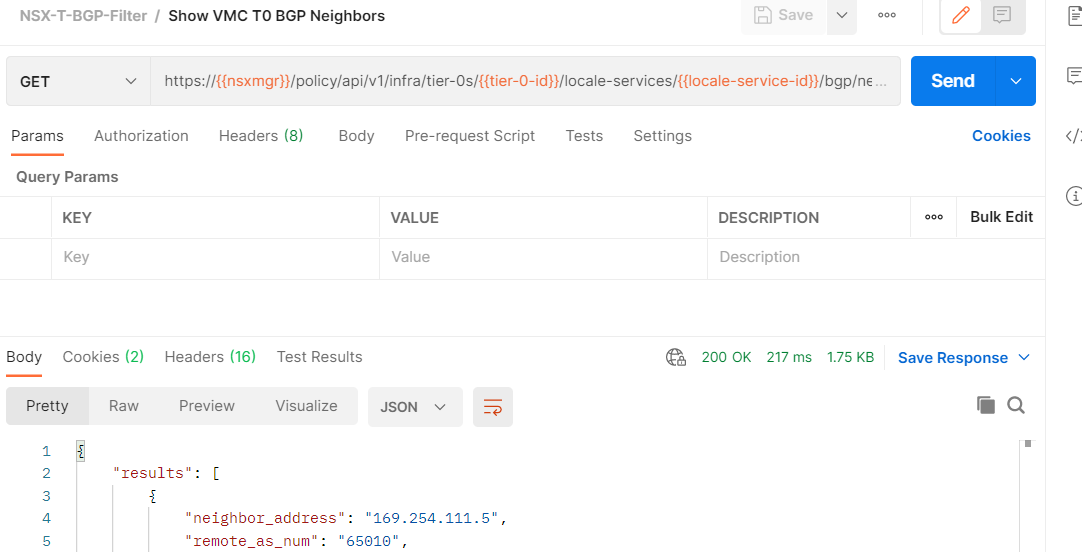
The JSON output looks like this:
{
    "results": [
        {
            "neighbor_address": "169.254.111.5",
            "remote_as_num": "65010",
            "keep_alive_time": 60,
            "hold_down_time": 180,
            "allow_as_in": false,
            "maximum_hop_limit": 1,
            "resource_type": "BgpNeighborConfig",
            "id": "f3eec340-e402-11ea-8356-ab0cb657a449",
            "display_name": "f3eec340-e402-11ea-8356-ab0cb657a449",
            "path": "/infra/tier-0s/vmc/locale-services/default/bgp/neighbors/f3eec340-e402-11ea-8356-ab0cb657a449",
            "relative_path": "f3eec340-e402-11ea-8356-ab0cb657a449",
            "parent_path": "/infra/tier-0s/vmc/locale-services/default/bgp",
            "marked_for_delete": false,
            "overridden": false,
            "_create_user": "x@vmware.com",
            "_create_time": 1598051239240,
            "_last_modified_user": "x@vmware.com",
            "_last_modified_time": 1623438822232,
            "_system_owned": false,
            "_protection": "NOT_PROTECTED",
            "_revision": 13
        }
    ],
    "result_count": 1,
    "sort_by": "display_name",
    "sort_ascending": true
}
Create Prefix List
We now need to create a prefix list to filter out route advertisements. Our network segment is 192.168.70.0/24, but we only want to filter out advertisement of any /32 routes in that subnet.
Add a new API request to the collection
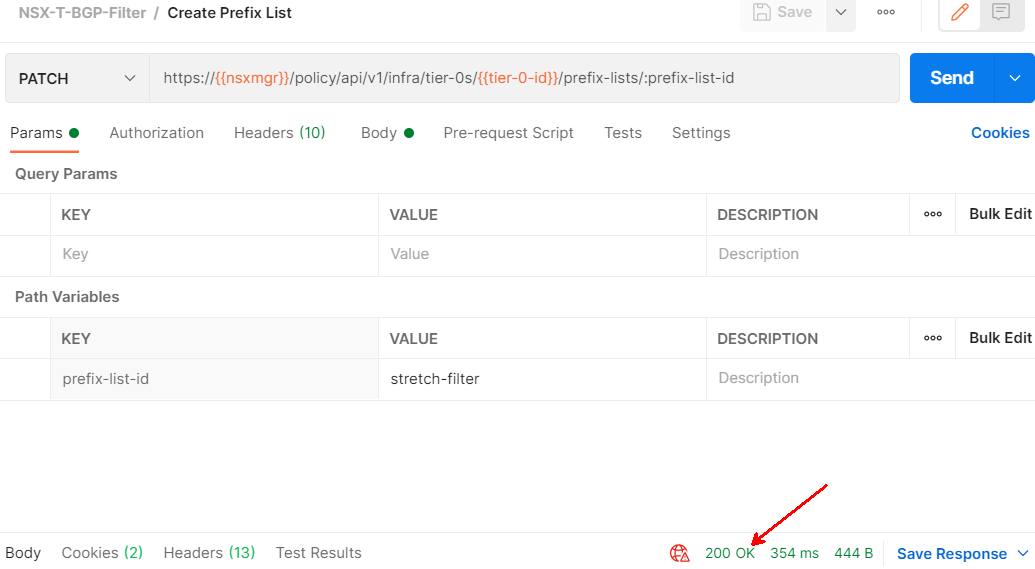
Name your request Create Prefix List

Make it a PATCH request, and paste the following URL:
https://{{nsxmgr}}/policy/api/v1/infra/tier-0s/{{tier-0-id}}/prefix-lists/:prefix-list-idWe need to give the Prefix List ID a value. We set the value to stretch-filter in the prefix-list-id key under Path Variables.

Now we move to the request body. Set it to raw, then change the type to JSON. Then paste in the following JSON. You will need to change it to match the networks you’re trying to filter out. The description and display name can be any string. The first prefix sets a DENY for network 192.168.70.0/24. The “ge” stands for “greater or equal”. The entire expression says to deny any advertisement of any /32 route if the IP address is in the 192.168.70.0/24 subnet. The second prefix is to PERMIT any other routes.
DO NOT FORGET THE PERMIT ANY. If you leave it off, you will block all traffic.
{
    "description": "Stretched network filter - /32s in 192.168.70.0/24",
    "display_name": "{192.168.70.0_24}",
    "id": "{{prefix-list-id}}",
    "prefixes": [
    {
        "action": "DENY",
        "ge": 32,
        "network": "192.168.70.0/24"
    },
    {
        "action": "PERMIT",
        "network": "ANY"
    }
    ]
}
Click the Send button and you should get a 200 OK
Show Prefix Lists
Add a new API request to the collection
Name your request Show BGP Prefix Lists

Make it a GET request, and paste the following URL
https://{{nsxmgr}}/policy/api/v1/infra/tier-0s/{{tier-0-id}}/prefix-lists
Click Send. We should get a 200 response with the prefix list we just created
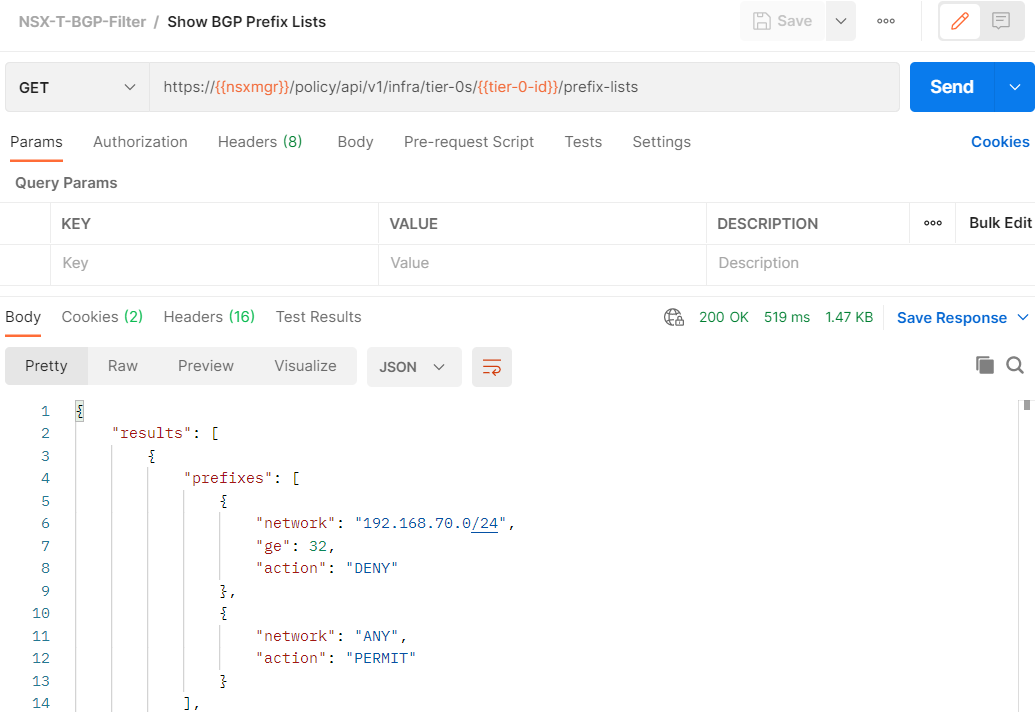
Here is the full JSON output
{
    "results": [
        {
            "prefixes": [
                {
                    "network": "192.168.70.0/24",
                    "ge": 32,
                    "action": "DENY"
                },
                {
                    "network": "ANY",
                    "action": "PERMIT"
                }
            ],
            "resource_type": "PrefixList",
            "id": "stretch-filter",
            "display_name": "{192.168.70.0_24}",
            "description": "Stretched network filter - /32s in 192.168.70.0/24",
            "path": "/infra/tier-0s/vmc/prefix-lists/stretch-filter",
            "relative_path": "stretch-filter",
            "parent_path": "/infra/tier-0s/vmc",
            "unique_id": "12d862d8-953a-438e-9b4b-bbd2f9106dc9",
            "marked_for_delete": false,
            "overridden": false,
            "_create_user": "x@vmware.com",
            "_create_time": 1623434509283,
            "_last_modified_user": "x@vmware.com",
            "_last_modified_time": 1623446248874,
            "_system_owned": false,
            "_protection": "NOT_PROTECTED",
            "_revision": 7
        }
    ],
    "result_count": 1,
    "sort_by": "display_name",
    "sort_ascending": true
}
Attach the prefix list
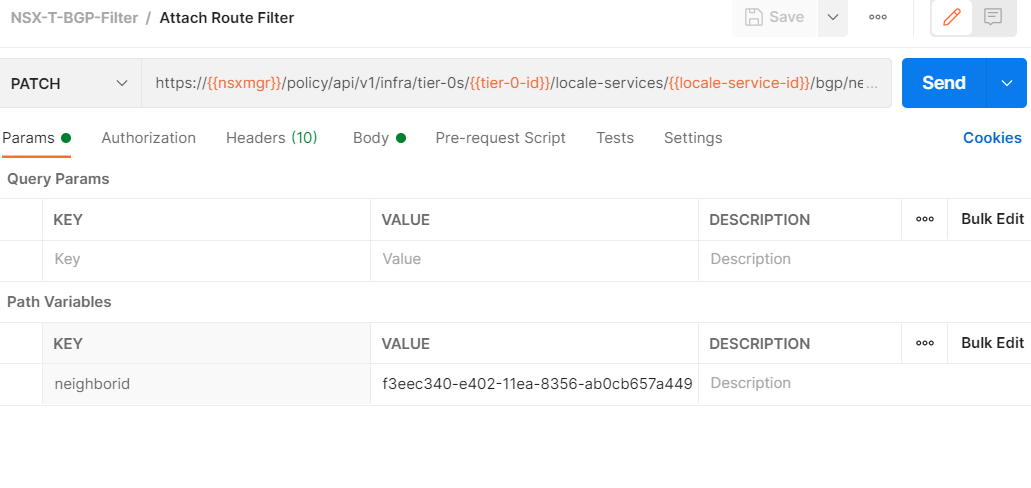
Add a new API request to the collection
Name your request Attach Route Filter

Make it a PATCH request, and paste in the following URL
https://{{nsxmgr}}/policy/api/v1/infra/tier-0s/{{tier-0-id}}/locale-services/{{locale-service-id}}/bgp/neighbors/:neighboridFor the neighborid value, we need to paste in the ID that we got back from the Show VMC T0 BGP Neighbors call.
This is the original JSON. We need to do the following:
- Remove any JSON keys that start with the underscore character
- Add JSON to connect the prefix list to the neighbor
{
    "results": [
        {
            "neighbor_address": "169.254.111.5",
            "remote_as_num": "65010",
            "keep_alive_time": 60,
            "hold_down_time": 180,
            "allow_as_in": false,
            "maximum_hop_limit": 1,
            "resource_type": "BgpNeighborConfig",
            "id": "f3eec340-e402-11ea-8356-ab0cb657a449",
            "display_name": "f3eec340-e402-11ea-8356-ab0cb657a449",
            "path": "/infra/tier-0s/vmc/locale-services/default/bgp/neighbors/f3eec340-e402-11ea-8356-ab0cb657a449",
            "relative_path": "f3eec340-e402-11ea-8356-ab0cb657a449",
            "parent_path": "/infra/tier-0s/vmc/locale-services/default/bgp",
            "marked_for_delete": false,
            "overridden": false,
            "_create_user": "x@vmware.com",
            "_create_time": 1598051239240,
            "_last_modified_user": "x@vmware.com",
            "_last_modified_time": 1623438822232,
            "_system_owned": false,
            "_protection": "NOT_PROTECTED",
            "_revision": 13
        }
    ],
    "result_count": 1,
    "sort_by": "display_name",
    "sort_ascending": true
}
This is the JSON that we need to add to attach our filter
            "route_filtering": [ {
                "address_family": "IPV4",
                "enabled": "true",
                "out_route_filters": [ "/infra/tier-0s/vmc/prefix-lists/stretch-filter" ]
            }]
This is the modified JSON with the underscore keys removed and the route filter added
{
"neighbor_address": "169.254.111.5",
"remote_as_num": "65010",
"keep_alive_time": 60,
"hold_down_time": 180,
"allow_as_in": false,
"maximum_hop_limit": 1,
"resource_type": "BgpNeighborConfig",
"id": "f3eec340-e402-11ea-8356-ab0cb657a449",
"route_filtering": [ {
"address_family": "IPV4",
"enabled": "true",
"out_route_filters": [ "/infra/tier-0s/vmc/prefix-lists/stretch-filter" ]
}],
"display_name": "f3eec340-e402-11ea-8356-ab0cb657a449",
"path": "/infra/tier-0s/vmc/locale-services/default/bgp/neighbors/f3eec340-e402-11ea-8356-ab0cb657a449",
"relative_path": "f3eec340-e402-11ea-8356-ab0cb657a449",
"parent_path": "/infra/tier-0s/vmc/locale-services/default/bgp",
"marked_for_delete": false,
"overridden": false
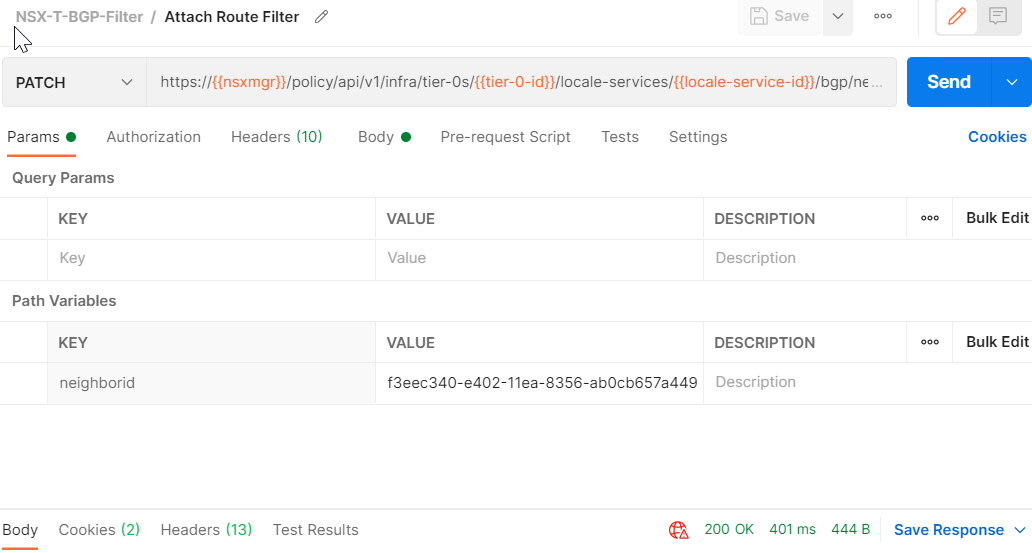
}Click Send. We should get a 200 response back.
Show the T0 BGP neighbor configuration again
Switch back to the Show VMC T0 BGP Neighbors API call and click Send.
The JSON has changed to include our filter
{
    "results": [
        {
            "neighbor_address": "169.254.111.5",
            "remote_as_num": "65010",
            "out_route_filters": [
                "/infra/tier-0s/vmc/prefix-lists/stretch-filter"
            ],
            "route_filtering": [
                {
                    "enabled": true,
                    "address_family": "IPV4",
                    "out_route_filters": [
                        "/infra/tier-0s/vmc/prefix-lists/stretch-filter"
                    ]
                }
            ],
            "keep_alive_time": 60,
            "hold_down_time": 180,
            "allow_as_in": false,
            "maximum_hop_limit": 1,
            "resource_type": "BgpNeighborConfig",
            "id": "f3eec340-e402-11ea-8356-ab0cb657a449",
            "display_name": "f3eec340-e402-11ea-8356-ab0cb657a449",
            "path": "/infra/tier-0s/vmc/locale-services/default/bgp/neighbors/f3eec340-e402-11ea-8356-ab0cb657a449",
            "relative_path": "f3eec340-e402-11ea-8356-ab0cb657a449",
            "parent_path": "/infra/tier-0s/vmc/locale-services/default/bgp",
            "marked_for_delete": false,
            "overridden": false,
            "_create_user": "xi@vmware.com",
            "_create_time": 1598051239240,
            "_last_modified_user": "x@vmware.com",
            "_last_modified_time": 1623447448230,
            "_system_owned": false,
            "_protection": "NOT_PROTECTED",
            "_revision": 14
        }
    ],
    "result_count": 1,
    "sort_by": "display_name",
    "sort_ascending": true
}
Validate Results
We check the T0 route table again, all of the /32s are still in there
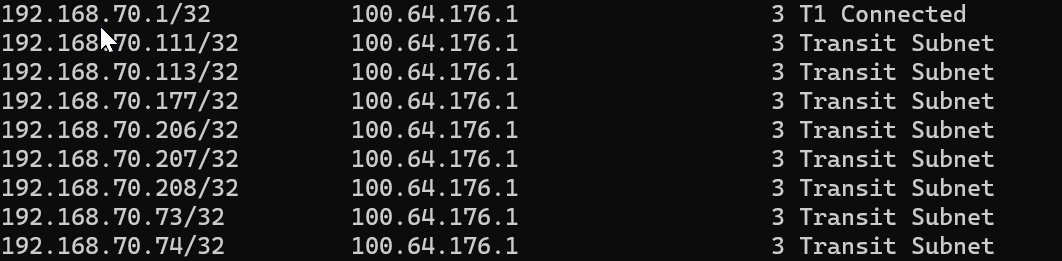
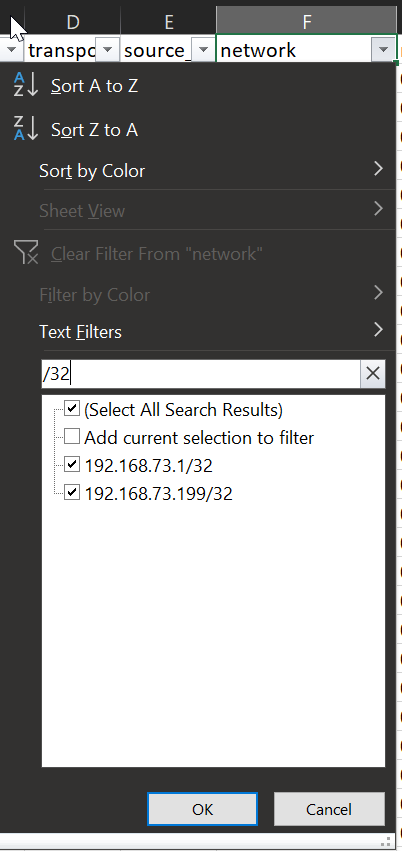
We download our advertised routes from the VPN connection again.
We filter the resulting file looking for any advertised /32 – all of the remaining /32 advertisements are outside of the 192.168.70.0/24 subnet. We have successfully filtered out the MON /32 subnets from route advertisement.
Whew, that was a long post. Thanks for sticking around until the end!
TGW to RB VPN BGP Route filtering on VMC on AWS - vminded.com
[…] by my colleague Patrick Kremer here on Github. By the way Patrick has also an excellent post here and and even if it’s not covering the exact same use case it was a lot inspirational to me. I […]
pkremer
Regarding the updating an existing prefix list, you’d do a GET on /policy/api/v1/infra/tier-0s/vmc/prefix-lists/[your prefix list ID] and then a PATCH on the same object after changing what you need to change
pkremer
Thanks Christophe.
I’ll update the post to link to this too, but Tom Twyman did a great writeup of the changes he implemented in PyVMC that cover adding multiple ranges. https://occasional-it.com/2021/09/20/pyvmc-attach-detach-your-prefix-filters/
Christophe LOMBARD
Nice post Patrick. I followed the settings and it worked fine for me. Do you know how to update an existing PrefixList? Also what is the syntax to filter multiple non contiguous subnet ?
Thanks a lot
Christophe